build diary
<< | show individual entries | >>July 11, 2005: 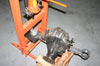 The new bushings are pressed into the differential housing.
entry 903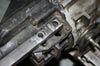 The first part of the differential mount comes together.
entry 904
July 14, 2005:
The Mini needs a bit of work on cooling (as do I, it's waaay too hot!
) which has taken away from Seven time. The Mini will get its own site shortly. Still, I did manage to finish the work on the diff last night. I just need to finish the mounts for the side points. I'll do the same thing that CMC did - it can be seen here on Heikki's site. Then it's back to my home garage with the bits so I can put some plate on the transmission tunnel and get this all bolted up. After that, it's simply a matter of reworking the (ugly) transmission cover, wiring in the new instruments and modifying the housing, adding sway bars and reassembling. The new harnesses (proper Seven ones with pull-down lap belts) will be here in a couple of weeks. I have some work to do before then!
entry 905
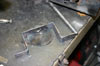
 My little baby PPF.
It's not sexy, but it will allow me to connect the diff in a better location and use more fasteners.
entry 906
July 19, 2005:
Well, the Mini has been cooled and now has it's own website.
So that's done then. The diff mounts for the Seven are done so now all I have to do is put the big lump back in the car. Then drill some new mounting holes and do some reinforcements to the tranny tunnel. The latter will be a bit of a hassle as, while I have the ability to weld at home, I don't have much in the way of fabrication tools. I'll have to make the parts at the Flyin' Miata shop and bring them home. I'm starting to second-guess myself on how much new bracing to put in the car. Seems to me that designing and mounting sway bars will likely be more important and if I want to have this thing up and running happily before the Open House, I should get to work on that. A little more desultory test-fitting last night indicates that the front Miata sway will not go in happily with my radiator mount. Should I move the rad, or do something different with the swaybar? A rear Miata sway would actually work pretty nicely in the front and may be all the bar I need. Still, it's hard to ignore the results found on the ex-GRM car. Decisions, decisions.
I've also taken a few minutes to start wiring up the new instruments. Now I just need the nerve to turn on the car and see if they work.
It appears my guestbook is attracting spammers. Interesting, most of the code is my own. I'll see if I can fix it. Meanwhile, I apologise for the idiocy.
entry 907
 The side braces for the diff.
These are only intended to keep the bolt from twisting back and forth, not to provide the main support for the diff.
entry 908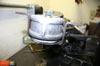 The side braces in place.
This one isn't actually attached but is just waiting to fall down, thus the appearance of poor fit.
entry 909
July 25, 2005:
I spent the weekend proofreading the layout of the new book.
So it was a very Seven-oriented weekend but not one that got a lot of work done on the car itself. Still, I did manage to wrestle the diff back in to place. My little PPF is perfectly lined up with the outside edge of the transmission tunnel. I'll put a piece of relatively hefty plate on the side of the tunnel for mounting. The PPF (actually, it's nothing like a PPF, it just bolts to the diff) will get captive nuts on the back to make it easier to attach. I'm also going to plate the whole transmission tunnel in 1/8" plate on the sides and just use aluminum on the top. It'll add a couple of pounds of weight but will also stiffen things up and get rid of the ugly misshapen cover. Hopefully tomorrow I'll get a chance to pick up the rest of the steel I need.
Swaybar thinking has progressed. A suggested spot for the front bar - slung under the chassis - is intruiging so I'll check that out. I'm still not sure if I'll run one in the rear or not.
entry 910
July 26, 2005: 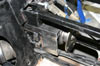 The new differential mount in place.
Now all I have to do is a whole bunch of welding.
entry 911
July 28, 2005:
I haven't managed to get much work done on the Seven this week, but I did spend a very successful hour on it last night.
I figured how to install the front sway bar nicely. I need a 1.6 bar (they have shorter arms than the 1.8) to fit, but I picked one up today from my friend Jim. He's the one who made this whole project possible with the donation of the green car, if you've read that far back. I'll check it tonight to see how it works but I'm pretty excited. Jonathan Freinkel has been doing some analysis of the "CMC Miata" geometry and found some weight jacking in the rear. Racetrack photos bear this out. His idea is that the sways front and rear will help counteract this.
This weekend I'll weld up the plates on the transmission tunnel to finish the transmission mount and start putting the poor neglected thing back together. A couple of extra reinforcements will also be added. And the Seven gains weight, hopefully for a good cause.
entry 912
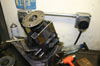
 Everyone wants a little attention.
The Miata is a supercharged one that I've been playing with. Why? Because it belongs to my girlfriend Janel, and she wants her "cute little car" to go fast. Who am I to argue with that?
entry 913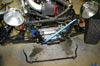 Trying to sort out the front sway bar.
The blue tape indicates an upcoming chassis tube.
entry 914
July 29, 2005:
Okay, that's odd.
The 1.6 bar looks to be identical in size to a 1.8 bar I pulled out earlier. I'll have to fit everything up and see how it works. I'd prefer a bar with slightly shorter arms. Perhaps I'll have to get creative.
The goal for this weekend is to have the welding done so I can reassemble the car. My new belts are on the way and I've decided to leave a few modifications for later just so I can get the car together. There's an autocross next weekend, you see. Unfortunately the stiffer springs are still in the UK so I'll see how the car works with new bars but the same springs.
entry 915
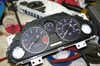 The 2002 instrument cluster is ready to install.
Well, maybe I should put the indicator for the water temperature on there somewhere. The needles sit a bit higher than in the earlier cluster so this might cause problems with the glass. The nice thing is that it's a bit lighter due to the electrically driven gauges.
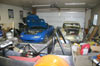
entry 916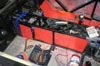 Ooooh, nice interior!
The orange poster board is being used to mock up the metal plates that will be welded into the transmission tunnel. This will both stiffen it and let me stop using the terrible-fitting transmission cover. The driver's side will be overlaid on top of the tunnel while the passenger's side needs to be welded between the bars for just that little extra clearance.
entry 917
August 1, 2005:
It was a busy weekend of fabricating.
I'm pretty happy, I accomplished more than I'd expected.
The differential mount has been finished and will definitely not move now. A piece of 3/16" plate (it might be 1/4", I forget) is welded to the side of the transmission tunnel and the baby PPF is bolted to that with 3 1/2" bolts. Some nuts are welded on the backside so it's easy to connect and disconnect. The rest of the transmission tunnel has been plated now so it looks much better, but now I have to remove the diff to pull the driveshaft. That's probably easier than the previous technique of pulling the seats and the transmission cover when I think about it. Not that anticipate much need to pull out that driveshaft.
On top of the armoring of the tunnel, I managed to get the sway bars fitted. The rear went in really nicely and is a stock 1.8 Miata rear without modifications. For the front, I shortened the arms on a stock 1.6 bar slightly. I'm proud of the mounts I built for the front bar as they're both strong (I hope) and light. They're not as pretty as I might like and I realised as I was welding them in that they're quite visible, but you can't have everything.
Last night everything was painted up and I'll be able to start reassembly tonight. Now I just have to redo a few wiring connections while I have the dash out and install my cool LED tach. I'll be driving this car again soon!
entry 918
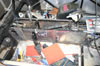 The cardboard templates have been replaced with steel.
The thick plate for the differential mount is visible at the back of the tunnel.
entry 919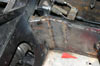 I put an angled plate in at the back of the tunnel to allow wires and brake lines to sneak past the differential as well as tie this area together.
The welds aren't too pretty but they should work.
entry 920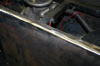 The weld at the top of the transmission tunnel was ground smooth to make it look a bit better.
entry 921 The tunnel is painted and is now ready for reassembly.
entry 922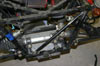 A reinforcement for the front of the car.
This should stiffen things up well. I believe this brace is required for Australian builds.
entry 923 The differential mount all finished and ready for paint.
entry 924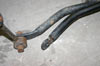 The front swaybar was shortened slightly to put the end link in a better place.
entry 925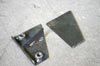 My original thought for a front swaybar mount was a simple piece of 1/4" steel.
I decided to fabricate something smarter instead. It's significantly lighter.
entry 926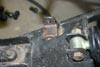 The sway bar end link for the front.
It's as far back on the control arm as possible in order to fit the stock sway bar.
entry 927
<< | show individual entries | >>