build diary
<< | show individual entries | >>October 27, 2004:
The reason for the clutch failure at the track is obvious now that I've untaped the hood and looked at it.
The upper mounting bolt for the slave cylinder got away. This let the slave rotate around when the clutch pedal was depressed. The piston came out, cocked sideways and jammed the whole assembly with the release fork slightly moved. Thus the slipping clutch and all the escaped fluid. All I need to do is fix the damaged threads in the bellhousing and replace the piston for the slave. The latter is part of the $9.95 rebuild kit I bought yesterday so it's a cheap fix!
There's another new build website up: Chris Flaccone's Hyabusa-powered beast. I need to put together a list of builds similar to mine.
entry 653
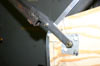
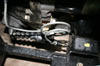 The cause of the clutch failure.
The upper mounting bolt for the slave escaped, the slave cocked over and the piston jammed the release fork partway out.
entry 654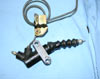 A little work on the hydraulic lines and a new piston for the slave cylinder and I'm back in business.
entry 655
October 29, 2004:
The plan for this weekend? Work on the windshield.
I picked up some 1/2" channel to go around the outside edge of the glass and I'll be chopping up plywood to make a template. I may have found the missing wiper pieces from a Mini and so I'll soon be able to drive without glasses. Maybe I'll also spend some time fixing the clutch so that I can actually drive as well.
On a less exciting note (well, less exciting to those who get excited about aluminum channel) I spent a bit of time working on the software for the website. You can now read the updates and look at the photos in chronological order. It's not such a big deal for those who read the updates every day but it should help the new visitors. Oh, and for those worried about CMC's responsiveness - I emailed Steve to give him an update on how the car behaved on the track. He responded within hours.
entry 656
October 31, 2004:
A good day to be working on an orange and black car, really.
I spent the day working on the windshield. A pattern was cut out of 3/8" plywood and then sanded into shape. I'm not great with wood - not enough patience, if you'll believe it! - but I'm pretty happy with the end result. It's not a fine piece of furniture by any means but the shape is right. I used welding rod to transfer the shape of the scuttle to the plywood. That was the part that concerned me the most but the rod proved to be just the trick.
entry 657
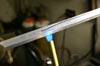
 In order to transfer the shape of the scuttle to the windshield template, I grabbed a couple of pieces of welding rod.
The blue tape is there to protect the paint of the scuttle.
entry 658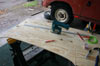 Cutting out the windshield template.
It's about 12.5" high in the middle. Note the colourful plastic protractor and compass - it's like being back in school. The compass has a "safety point" to protect me from myself, unlike the ones I remember.
entry 659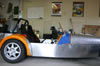 The final height of the windshield.
entry 660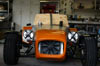 From the front.
I'm fairly happy with the appearance of the windshield although I'm hoping the final result will be a little more transparent.
entry 661
November 1, 2004:
The windshield glass is cut!
I'm impressed. The glass shop (The Glass Brokerage in Grand Junction) quoted about $36 to cut the screen and said it would be done "maybe today, might be tomorrow". Three hours later they called up and told me it was done - and the final price was only $31. Now that's a company I like to work with!
I've put up a diagram of how I arrived at the shape for my windshield. One thing to note is that the CMC scuttle was close but not quite symmetrical. I'd recommend careful shaping! Tomorrow I'll build a tool to bend the aluminum extrusion as suggested in the Locost book - one of my rare uses of the tome - and see how that works out.
entry 662
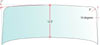 Some details on the shape of the windshield.
I put a nail into each of the three locations marked by a circle and then put a piece of welding rod between them - over the middle one and under the two on the sides. This gave a nice constant curve.
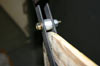
entry 663 A view of the welding rod being used to shape the top of the windscreen.
entry 664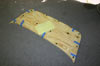 The glass for the windshield is cut!
entry 665
November 2, 2004:
I fabricated a tool for bending up the aluminum channel as seen in the Champion book.
The problem is that the channel buckles every time I try to bend it. I'm using 1/16" wall aluminum - thicker might prevent it from kinking, but it would also make this quite difficult to actually bend. Hmm. I might take it to the professionals.
entry 666
 Hmm, the aluminum channel doesn't seem too happy about bending into shape.
Every time I try, it buckles.
entry 667
November 3, 2004:
Upon a suggestion from the Locost mailing list, I tried annealing the channel before bending it.
This is accomplished with a propane torch. It certainly made the channel easier to bend but it didn't prevent it from kinking on me. Tomorrow I'll wander down to my local fabrication shop to see what they think about it.
entry 668
 Annealing the aluminum to make it more pliable.
entry 669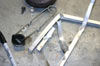 Nope, the annealed channel didn't work either.
Easier to bend and with less dramatic kinks, but still not good.
entry 670
November 4, 2004:
Well, I've been innundated with helpful suggestions about the windshield!
Thank you everyone. There's a lot of information and a lot of interest in how to accomplish this. After talking to my local fabrication shop, I'll try annealing the aluminum several times before attempting to bend it and letting it air cool. I'll put a 1/16" shim in between the plywood and the channel to take up a little bit of slop that's letting it kink inwards. Once I've tried the bend and if it kinks again, I have been given a set of instructions on the best way to "tuck" the channel back flat again. Right now the channel is cooling down from the initial annealing attempt...
entry 671
November 5, 2004:
Closer.
I've made a number of improvements to the various tools involved. Lots of annealing with a propane torch (and a certain amount of melted aluminum due to an acetylene torch) was the start. I also tighened up the tolerances on my bending tool which seemed to help a little and added a clamp to hold things in place - but what helped most of all was putting a metal shim on the side of the form. See, my channel was 1/2" x 1/2" x 1/16" wall. If you do the math that means there should have been a 3/8" gap - like my form - but it was actually more along the lines of 1/16" greater. This gave the aluminum the opportunity to squish inwards. Removing this option seemed to make a big difference. It's still not perfect but it may be enough to accept for the time being. One tip from a successful builder was that his channel was 5/8" x 5/8" x 1/8". Perhaps the thicker wall is less prone to buckling. I might give that a try as well if I can find it at a hardware store this weekend.
entry 672
 My original bending tool.
The tolerances are a little high. Could this be the problem?
entry 673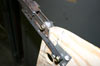 The New!
Improved! bending tool. Tighter tolerances. Is it good enough?
entry 674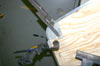 Aha!
Aha!
A clamp added to the form kept the channel in place and a metal shim ensured there was no play. It's a very good bend but not perfect.
entry 675 There's still a little crimping in the channel after being bent.
entry 676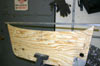 The next challenge - how to bend this?
entry 677
<< | show individual entries | >>