build diary
<< | show individual entries | >>November 7, 2004:
I've done it!
I started by remaking the tool once again with a larger wheel, as I'd seen a bit of distortion at the end of one of my failed bends that was due to the small radius of the wheel and to some overly-chamfered edges. A 2 1/8" hole saw and a piece of 1/2" aluminum plate and I had my new wheel. I was smarter about the order in which I measured, drilled and welded on this one so it ended up with tighter tolerances than before. It was so tight, in fact, that in one of my bends it started to tear up the metal. Some good oil solved that problem on the next bend. But the real secret was in the aluminum channel.
On a trip to Home Depot yesterday, I decided to look at what they might have to offer. I was looking for some 5/8" channel with thicker walls, as it appears that Ron Champion used 5/8" from a badly-labeled diagram. I didn't find that but I did notice that the 1/2" channel appeared to be softer. It was a slightly lighter colour than the one I'd been using and seemed to have a more satin finish. It was also about $3 cheaper for an 8' length, so I bought some home. I annealed it with the propane torch (the temperature of this is just about perfect - burn off a Sharpie line and you've got it) and it bent beautifully. So that was the problem all along. Whatever kind of alloy I was getting from the local fabrication shop was less excited about bending than the cheap stuff sold in every hardware store. The display was labelled "SteelWorks" and it's carried by Lowes, Home Depot and Tru-Valu. So, the tricks to a perfect bend are the correct aluminum, annealing, no slop in the form and some lubrication. I don't think many of the other things I tried matter. Now I just have to bend the bottom form but that will be easy enough to do by hand. I have the piece of plywood that I cut out of the bottom to use for shaping and some test bends indicate that this is pretty easy. Then it's just a matter of mounting it to the car and I already have ideas there.
entry 678
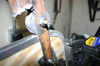 Yet another version of the bending tool, this time using a larger wheel.
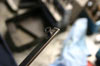
Nice tight clearances and a decent bend - but I should have used some lubrication to prevent scarring like this.
entry 679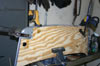 Success! A perfect bend.
entry 680
November 9, 2004: 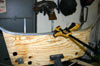 The bottom bend was done by hand on the piece of plywood that had been cut from the bottom.
The shape was then tweaked slightly against the main template. A simple and quick job.
entry 681
November 11, 2004:
I fixed the clutch problem last night so that I could drive the Seven to work.
A Time-Sert thread insert and problem solved! I still need to put a limiter on the pedal. The windshield will go on the car this weekend as we're having a bit of a boy's night out tonight, playing Gran Turismo on a giant TV with my homemade "driving pod". Hey, we're all kids at heart.
entry 682
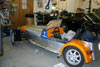
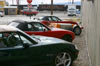 Staff parking at Flyin' Miata.
entry 683
November 13, 2004:
I spent the day working on installing the new lift at Flyin' Miata and building the windscreen for the Seven.
Jonathan Adams and I have been chatting about how to attach the windscreen to the car and I am shamelessly using his suggestions instead of the setup I had originally suggested. I'm having a bit of trouble getting everything built to the quality that I want so it's taking a long time. I might start a couple of sections over. But it's raining outside so it's not like I can drive the car...
entry 684
 The windshield will be held to the side braces by this steel insert inside the channel.
entry 685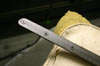 The first part of a side brace is ready.
I'm not sure if I'll expand this to use four screws instead of three.
entry 686 This is how I'll fasten the two sections of the windshield frame together.
The rivet heat will be hidden behind the bracket when it's installed. The "book" method wouldn't have worked on my 1/16" channel. Ignore the poor fit of my test item, please!
entry 687
November 14, 2004:
Well, the windshield frame is finished and the side braces are ready to go.
I started over with my setup for fastening the side braces to the frame because I just couldn't get the finish I wanted. A note - countersunk fasteners are not very tolerant of any sort of mistake! Your eye can easily pick out an off-center fastener. Some careful cutting and measuring has given me an acceptable fit now. The side braces are done and look good. They took a little bit of tweaking in terms of angles to allow them to sit flat on the sides of the car but it did go fairly quickly. I started to install the glass - and hit a problem. The glass must be very slightly larger than the plywood. Enough that my tight tolerances were too tight but not enough to notice when you lay the glass on the wood! Once the inner tube was added, it was obvious that there was no way to install the frame around it. So I have two options - make the glass slightly smaller or make the frame bigger. I'll ask the glass shop tomorrow if it's possible to grind this down, and how. I'm happy with how everything else turned out but I had really hoped to drive the car today with the new windshield. Oh well...
entry 688
 Test fitting the completed frame.
Bill's suggestion? "Bigger holes in the wood so you can see where you're going."
entry 689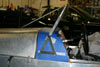 Starting to build the side braces.
entry 690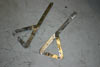 The side braces, ready for paint.
entry 691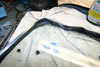 To install the windshield into the frame, I think I'll use inner tube.
It's easy to remove and gives a good fit. Two 26" tubes are needed for the whole windshield.
entry 692
November 16, 2004:
The windshield is done!
I'm a little too excited about this, methinks, but for some reason it feels like the car is done. It's not - it needs wipers to be legal - but I can drive without goggles and the car looks better balanced. I'm still not sure if the glass should be 1" shorter but it works.
It turned out that the easiest way to get the glass to fit was to cut a new piece. It cost about the same as making a new frame and was much faster. Once again The Glass Brokerage in Grand Junction came through, working hard to make the perfect piece of glass and turning it around the same day. All for $30. Have I mentioned how much I like doing business with them? I'll be bringing the car by to show it off today because they're curious about what they've been working on.
With the new piece of glass, it was a matter of minutes to fit it inside the frame. The fitment is perfect with nice tight joints. Whew! I had been worried about that. I used a razor blade to cut away the extra inner tube, bolted up the side brackets and drilled a few holes in the scuttle. Voila, a windshield and a car that looks better! Funny, I'd never thought it needed the glass before but it's well balanced visually.
Driving the car with the glass in place is really nice. I have lots of visibility without the top cutting off any of my vision and I can comfortably drive without glasses. There's still turbulence - of course - but it's manageable. I had a great drive in to work today in crisp conditions and a big stupid grin on my face.
entry 693
 The new windshield glass is installed in the frame.
Now I have to trim the leftover inner tube.
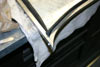
entry 694 To protect the paint on the scuttle, some leftover inner tube was glued to the inside of the side brackets.
entry 695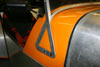 A detail of the windshield installed.
Some of the contouring of the side brackets can be seen here. The countersunk bolts make for a clean installation.
entry 696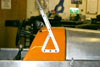 A side view of the brackets.
I'm very happy with the symmetry here.
entry 697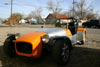 The car looks better with the windshield - that was a bit of a suprise.
entry 698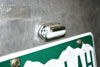 Not exciting, but required.
A licence plate light.
entry 699
<< | show individual entries | >>