build diary
<< | show individual entries | >>March 24, 2004:
The lines fit pretty well but they're about 3/4" longer than they need to be in the front.
I can deal with that. Since I'm so tired of wiring I'm going to play with the steering for a while. I've figured out how to route the steering column in a way that will require a minimum of u-joints and modification. All I need is a very large rod end to support it. Expensive!
I didn't do any work on the car this past weekend because I was out playing in Moab with the Land Rover. It's a wonderful time of year here.
entry 194

March 26, 2004:
I've managed to find an inexpensive pillow block to support the steering column.
Now I just need to hunt down the appropriate tubing. Here is a great series of photos of a live-axle CMC buildup. I'm considering using a similar blue for my car when it's done. I like being able to see how someone else has solved many of the same problems. It's interesting to see how early he installed the body panels.
entry 195
March 29, 2004:
Finally, some work that's not wiring!
The new brake lines are in. Since the metal supply yard wasn't open on the weekend I wasn't able to do any work on the steering. So attention turned to the seats. It was very rewarding work. The driver's side is done and ready for the reupholstering of the seat base. The passenger's side now fits - snugly! - but still needs some trimming. I've managed to get the driver's seat placed perfectly for myself and with a lot of lateral support. I'm happy with the way it's all turned out.
Steve at CMC tells me that a number of my missing parts are coming. I'm not sure exactly what, but it's good news no matter what. Hopefully there's a fuel cell in there so I can set up that system. Lester Seal also picked up his frame etc this weekend so he's a happy camper.
I went for a long drive in the Miata this weekend - heading up to the ski slopes, 6" of fresh powder and warm temperatures - and did a lot of designing for the instruments in my head. I think it's worked out now. I also decided that I'll be very happy if the Seven handles and rides as well as my Miata. It shows the results of 9 years of tweaking and works extremely well.
entry 196
 The stainless steel brake lines are in!
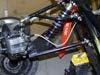
entry 197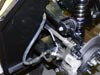 The brake line for the left rear wheel is a pretty short one!
It's long enough for full suspension travel with careful alignment, luckily. Moving the bracket further in on the frame would give a little more room but would also require more modification to the hard lines. As it is, the Mazda hard line fits pretty much perfectly - nice trick. Note the re-routing of the parking brake cable. This puts it above the bottom of the car. Thanks to Steve at CMC for the routing suggestion!
entry 198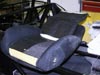 Snipping three hog rings makes it easy to access the lumbar support of a Miata seat.
entry 199 Since there's no room for the rake adjustment, I've bolted the seatback directly to the frame on the outside.
The other side uses the existing pivot that attaches it to the seat cushion.
entry 200 The passenger's side doesn't have as much room and the seat is too wide to fit between the rails.
entry 201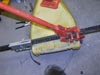 How to make a seat narrower - use an 8000 lb Jackall jack!
It worked beautifully. The base was "modified" with the help of a small sledgehammer. I used a different technique on a Corbeau seat a few weeks ago...
entry 202 The passenger's seat in place.
It's a nice tight fit for me right now, but I'll take out some foam in the bolsters for a little more room.
entry 203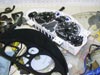 The stock Miata instrument cluster is getting modified so it can snuggle into the dash without looking like an afterthought.
entry 204
March 30, 2004:
More foam-ripping fun!
It's easiest to cut seat foam with a serrated knife, by the way. A bread knife works very well. I'm almost done with the seats now, with only a bit of sewing on the base for the passenger's side. I'm very happy with the way the seats have turned out. They look good, are comfortable and should offer great lateral support - at a decent price! They won't be adjustable but that's not really a problem for me. I know that GRM wasn't happy with the Miata seats in their build but they also didn't take quite as long to fit them properly. One of the downsides of a two-day build...
entry 205
 The driver's seat went in fairly easily.
I cut some foam out of the back for more lateral support and the bottom has also been lowered. I've also put a slot through the seat cushion for the harnesses. The cloth cover has a slot sown in it now as well. This is a comfy setup.
entry 206 The passenger's seat after trimming and ready to be reupholstered.
An interesting note - the void near the top (by the red discolouration) was a bubble in the foam from the factory. It had been slit open and a piece of green foam shoved into place, then taped up. Obviously a factory job.
entry 207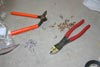 Tools of the trade for upholstery.
It's easy to use zipties, but the hog rings can dig new holes if required.
entry 208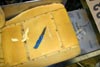 Cutting a slot for the harnesses.
You can also see the trimming to the foam on the side of the seat base to fit the narrow tunnel.
entry 209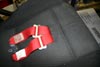 Harnesses in place with a sewn seat cover.
This was done by hand.
entry 210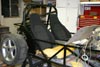 The seats are almost done.
The bump in the side of the driver's seat is actually just a part of the black frame visible behind the black seat. And no, that wheel isn't attached!
entry 211
April 4, 2004:
Enough with seats for a while, it's time to play with steering!
I've extended the steering shaft. It'll get reinstalled tonight, then I can make the rack move with the steering wheel. Once I adapt the wheel to the column, that is. The tie rods will wait until my new rod ends are delivered.
I've also been working on my Cadillac. It got a new Rochester carb off my parts car to replace the Carter it had, but it turns out the carb needs a rebuild. Sigh. At least I found out why the seat wouldn't move - there were some flares jammed underneath. The manufacture date on the flares is 1978. I'm not sure they were built with a 25 year service life!
entry 212
 Step one in extending a steering column.
Cut it in half!
entry 213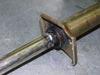 A tube is welded over the stock shaft.
It's welded around the end of the tube as well as spot welds through a couple of holes.
entry 214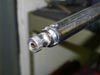 After the shaft is fitting to the car, the tube is cut to length.
The splined end of the steering shaft is welded into place.
entry 215 The final steering column, ready to reinstall.
entry 216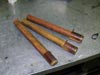 ...and for something a little different, here's why the seat in my Cadillac wouldn't slide forward! Some flares were wedged underneath - flares from 1978.
entry 217
<< | show individual entries | >>