build diary
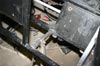
<< | show individual entries | >>March 21, 2006: 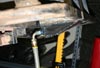 The sump from the side.
The fuel line is just hanging off here as I had been checking the clearance for the nuts. The ugly welding along the seams is not needed, it's fully welded inside.
entry 1163
March 22, 2006:
I used a smoke machine to check for leaks last night.
It runs a couple of psi of pressure and is great for finding air leaks. A couple showed up and I decided to weld all the seams in the tank from the outside as well as the inside just to be sure. That stopped the smoke leaks, but when I filled the tank with methyl ethyl ketone to degrease it I found a couple more. I've decided to grind all the exterior welds down to check them for pinholes and also because, well, it'll look prettier! With the tight fit in the car it's likely any external welds will cause installation problems anyhow. The coating should stop the pinholes but I'd rather use that as a backup instead of relying on it. The current plan is to finish that grinding and cleanup tonight, then coat the tank tomorrow.
entry 1164
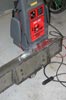 Using a smoke machine to check for leaks.
I found a couple. This picture was taken after I was done - you can't test with the gas cap off!
entry 1165
March 23, 2006:
Last night I spent a bit more time fixing little leaks.
Not squirters but slow drips. The sealant would take of that but I'd feel better having metal to back it up. Then I degreased the tank with methyl ethyl ketone (MEK) and filled it full of Kreem Tank Prep A. From the smell of it and from my reading, that's basically just dilute phosphoric acid. So is Metal Etch, so I used part of a bottle of that to get to the desired concentration. I left the tank to stew overnight - longer than required for a new tank, but the timing worked out for me.
This morning I came in early to discover a couple of spots where the acid solution had escaped past the tape and made a nice mess on the workbench despite a bunch of prophylactic paper towels. Ah, let's just call it art. I rinsed out the tank and used Kreem Tank Prep B (aka MEK) to get rid of any water. Then it was time to play with the Kreem goo itself. Pour it in, rotate the tank all over to let it coat, let it sit, rotate the tank all over, drain and let dry. The second coat will go on in a couple of hours and then I'll let it cure for a few days as I play with plumbing and painting the outside. Then, finally, I'll have the tank done.
entry 1166
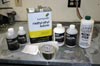 Mmmm, chemicals.
This is what it takes to seal up a gas tank. The aluminum tape in particular is very useful. Also note the attractive finish on the workbench after a small acid leak.
entry 1167
March 27, 2006:
No work over the weekend as I was in Denver picking up some random parts.
I learned a few interesting things and had a chance to crawl all over Skip Cannon's turbo Miata powered Caterham. He's doing a really nice job and examining the car really underscores the difference between a Locost and a Caterham. Where mine seems to subscribe to the "I'm not sure how strong this should be, so let's use big tube" theory, the Caterham has delicate tubes that are carefully placed. There's a lot to be learned from these cars and a few of their designs will be transferred to my car shortly.
entry 1168
March 28, 2006:
I spent some time fooling around with wipers last night.
Those who have read my book will see a reference to the wipers being installed. Well, that was artistic licence. I've had the parts for some time but never installed them on the car. I received an education in the mix-and-match Lucas wiper system. It turns out that if I try to use all my undamaged parts, I'll have less than 90 degrees of sweep. This is due to an early wiper motor and late model "wheelboxes". The combination of gearing is all wrong. I'll poke around and see if I can find the parts I need to make this work. After striking out on the wipers I cut the foam for the fuel tank and spent some time cleaning out the holes so all the fittings can be installed. Now it's just a matter of the final bracketry and then paint. Hopefully tonight.
Andy from Titan Motorsports showed up again today with a truckload of very sexy parts. Most of them were for various Miatas we have at the shop but a set of roller-barrel throttle bodies would fit the Seven nicely. Time for some dyno fun!
Chris Fiaccone suggested that my backwards louvres could be solved by cutting out the offending parts and inserting some mesh. Not a half-bad idea. Mark Rivera (who is showing amazing daily progress on his car) is going to send me a pre-punched sheet of aluminum that I will bend up for a new hood. But in the meantime, I might give Chris' suggestion a try.
entry 1169
 Sexy roller barrel throttle bodies.
No restrictions here!
entry 1170
March 30, 2006:
I removed the original battery tray (surprisingly heavy!
) and welded in a couple of short bars to help support the fuel tank. The tank was dropped back in and, um, didn't want to fit. It was wedging up against the rear uprights and forcing the sump against a frame crossmember. Why? Good question. With a little push the tank dropped in but I've lost about a millimeter of clearance that I sorely needed. At least the tank does still go in with a little push. Hopefully it'll still do that once painted. At worst, a bit of bending on the rear uprights will bring back my millimeter. The good thing is that it makes it easier for me to build a good "tank restraint" system if the tank doesn't want to move in the first place!
entry 1171
 A new bar to support the fuel tank.
entry 1172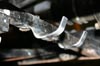 This little bracket will hold up the fuel pump.
There will also be a couple of clamps holding it to the frame member.
entry 1173
March 31, 2006:
No work done on my part last night other than some experimentation with an old roll cage and a Corbeau seat on my rally Miata.
However, a few others have been working on my behalf. Mark Rivera took a bit of time out of his manic build to punch some louvres in a sheet of aluminum for a new hood. Thanks to a small error, he had to use 0.060" metal which carries a bit of a weight penalty but I'll live with that. The louvres are also 4" wide instead of the 3" I used before so we changed the pattern around a bit. How will it look and will I be able to bend it? Well, it's 3003 alloy this time which is softer than the 5052 I've used in the past. The hood is definitely resisting efforts to go together easily!
Jim at Coveland Motorsports managed to dig the wheelbox I need out of an old Spitfire and will be sending it my way. Thanks to both Jim and Rod McLellan of the Octagon Motor Group for answering my questions about the details of Lucas wiper systems. It's a ski weekend so this is my last break before the Car and Driver test. I'll enjoy it while I can!
entry 1174
 My new hood!
Some assembly required. Mark Rivera punched these louvres and will ship me the sheet of aluminum.
entry 1175
April 4, 2006:
Ahhhh, that was some gooood skiing.
The gas tank is painted and installed.
I've plumbed everything in, altered wiring, strapped down the pump and added in a new fuel filter. The latter is a bit of an experiment. Due to the packaging of the Miata filter, I decided to try a generic inline unit. It's intended for carbureted cars. Hopefully it won't pop - at least it's a metal case. Hmm, perhaps a little more effort on fitting the Miata part would be in order. The big step will be tonight. I have to fill up the tank. I stopped there last night because I had a mental image of the tank leaking like a colander and I didn't have the stamina to deal with it.
My friend Matt in Australia sent along a scan of a review of "How to build a cheap sports car" from Hot 4s & Performance Cars magazine. "In a nutshell, this is one excellent book". That just makes my day. The Eastern Canadian Lotus Club also mentioned it in their newsletter - the ECLC is the Lotus club I used to pester back when a Seven was just a tickle at the back of my brain.
entry 1176
April 5, 2006:
The fuel tank is full of fuel, and staying full of fuel.
My fears of uncontrollable leaks were unfounded. I also pressurised the system without any drama. That's all good then. The new tank sits super-low and the whole rear end is on display. If I want to carry luggage, I'll have to make sure there are no hanging straps to catch on the axles! Either that or I'll make box as a "trunk".
After the tank was finished, I rivetted the rear panel back in place and bolted up the fenders. It all went pretty easily as it should. Wow, there's a huge trunk in the car now. It's amazing how much space was being wasted. While I had the rear fenders off, I swapped the new springs on to the shocks and set the ride height to a more-or-less random setting. I'll do the fronts tonight and cornerweight the car. Then it's a proper alignment on a rack. Let's see how well I've done with my camber gauges and toe plates! One of the tires is being flipped on the wheel due to some inner wear. Once that's all done, I'm ready for the track day this weekend. It's a shakedown for the Car and Driver test so I'm eager to see how it all works out. Hopefully I'll have time to do some proper testing, as this particular group tends towards massive chaos trackside.
entry 1177
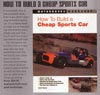 From the April 2006 issue of Hot 4s & Performance Cars magazine.
entry 1178 The gas tank all painted and in place.
It's hard to photograph this thing!
entry 1179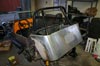 The car comes back together.
The installation of the rear panel is a lot easier the second time than it was originally. That time I had to reshape the back of the car!
entry 1180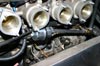 My new fuel filter.
entry 1181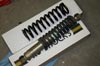 Longer, stiffer springs for the rear.
Why longer? Because it's almost impossible to get 9" springs in the rates I needed.
entry 1182
April 6, 2006:
I popped the front springs on last night, added some rear wheels and dropped the car down.
Holy cow, those new rear springs are stiff. The front seems a less drastic change. I realised that I needed someone else to help me set up the ride height and I was fresh out of helpers. Nuts. Decision time - do I have the car aligned on the rack to make sure the fundamental setup is good without any wheels pointing off in strange directions even though the corner heights will change, or do I do the cornerweighting first? I know it would be ideal to do the cornerweights first, but that's not going to happen. I decided to go ahead with the alignment anyhow. I did pop the car on the scales though, it's down to 1311 lbs wet. Not bad!
So, out of the garage. The rear end is definitely firm. I might have to back that off a touch. The fronts seem to work well but honestly, driving to work isn't a tough test. I may end up disconnecting the rear sway bar to get a good balance but the rear is actually softer than it was before if you compare it to the front. Trust me, that last sentence makes sense! The rears are 43% stiffer while the fronts are 66% stiffer. There's certainly much less roll on the street.
Obtaining the springs themselves was a bit of a trial. I ordered the fronts directly from Pro Shocks - they showed up three days later, just what I wanted - and ordered the rears from Pit Stop USA. It wasn't until the first box arrived a few days later that I realised I'd ordered Pro Shock springs from both companies. Pit Stop USA was less expensive though. Well, until their package showed up. I wasn't able to track it due to a mis-entered tracking number. This was after I had to determine what the mystery password created for my account was and a long conversation full of comedy with the customer support line. When it did show, the springs were the wrong size. After a couple of days, it was determined that the springs I'd ordered did not exist despite the happy writeup on the website. In fact, Pro Shocks doesn't even make springs in that length and diameter. So they had to ship me some others that were an inch longer. All in all, a pretty messy customer experience and there were some notes on the return label that have me concerned. I'll be watching my credit card statement. Next time I'll go directly to Pro Shocks and spend the extra $20 per spring. Either that or find out how to order some of the 10" Legend springs from various online suppliers.
As a complete contrast to Pit Stop USA's fumbling around, Jim Coveland at Coveland Motorsports managed to find the wiper wheelbox I needed in a 1967 Spitfire. He's sent it my way and is asking only for thanks. It's fairly obvious who's going to get my business in the future. Thanks Jim!
Some fun stuff. I've mentioned this site once before due to the models, but I neglected to look around. Check out some of the links - a visit to Arch Motors with some stunning pictures, some beautiful illustrations and of course, Out-of-a-Box Designs. Worth a few minutes.
entry 1183
 I can't stop taking pictures of the new "trunk" - but I can't take a good one.
Thos one certainly illustrates how much the rear suspension is on display. I never thought I'd regret writing on top of the differential!
entry 1184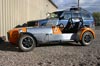 At work with the new exhaust.
Some of us at Flyin' Miata have bigger toys than others.
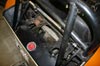
entry 1185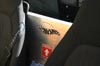 A couple of stickers on the rear bulkhead.
What can I say, I couldn't resist.
entry 1186
<< | show individual entries | >>