build diary
<< | show individual entries | >>September 5, 2005:
During the long weekend, I spent a few minutes here and there working on the Seven.
First, the throttle bodies. The first drive, the throttles started sticking open as things got warm. I thought I had enough slack in the cable but apparently not. The next sticking problem was solved by giving part of the linkage a little tweak. Now it idles happily at 850 rpm just like a "real" Miata engine. Well, almost. When it's cold, it's not terribly happy to idle. Part of this is due to the lack of any idle speed control valve and part of it is due to some fairly rough tuning at the moment. On the road, though, it runs reasonably well. Doesn't want much fuel, though. Hmm. Am I that far off on the correction for the new injectors or is the car not making much power? The dyno will tell. I know right now that the car is making some very cool induction noises.
I did discover one problem that had been driving me nuts the last time the throttle bodies were on. Every time I saved any changes to the ECU, the car wouldn't start up. This time I decided to hunt down the problem. Finally, I plugged the old throttle position sensor and idle speed control valves back in. Problem solved. The ISC makes some clicking noises so maybe that's what the problem was. Very odd.
Tonight, I decided it was time to do something about the foolish fender stays. The only time they've ever fit properly was on the first drive out of the garage. The front fenders hit the headlights at lock, they would move around on every drive, various parts of the stays would break and it was a pain to both install them and bleed the brakes. Those who have been reading for a while will know how much reshaping I had to do in order to make them fit in the first place. So, after they broke again at the most recent track day, I decided it was time to stop screwing around with the poor design and build something better from scratch.
I took inspiration from this Stalker build and picked up some 1/2" rod. It was easy enough to bend in a vice with a bit of leverage and after a bit of thinking, I figured out a simple way to make it all work. I still need to put a short stop on them to keep them from rotating around their mounting bolt but I'm very happy. The design is cleaner, much easier to install, leaves lots of room for bleeding the brakes and looks good. They're also much more solid and the fenders now clear the headlights and provide a little more stone protection. The downside? The new ones are 2.50 lbs instead of 2.30. That's a sacrifice I'm willing to make.
One last thing - while playing around with these, I found the rod ends used on the upper control arms were wearing. One side had axial play while the other had both axial and radial. Now, this car has seen a fair bit of racetrack use. But these must have been some pretty junky rod ends to start. I'll order some decent ones tomorrow and also replace the studs with bolts.
entry 977

September 6, 2005: 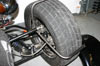 One of the new front fender stays in place.
A 1/4" piece of steel plate is held in place by the upper bolt. I'll add a short brace to one of the other bolts to prevent the whole thing from rotating.
entry 978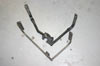 The old vs new fender stay.
The old design had a slot that went over the upper bolt, it's been replaced by a hole in just the right place. Accuracy versus adjustability. The floppy straps have been replaced by 1/2" rod bent to the right shape and the ineffective brace to the upper brake mounting bolt is currently removed. This new design was also much easier to produce than the original one. I suspect the original design came from Champion's book and was never rethought.
entry 979
September 7, 2005:
I've been a bit tough on CMC for various things in the past, sometimes a little too much.
But this latest discovery? I'm not happy.
While working on the fender stays, I discovered the studded rod end used to join the steering knuckle to the upper control arm was worn. On one side, there was axial play. On the other, there was both radial and axial. In both cases the amount of play was significant. I know that rod ends are prone to wear but this sort of lifespan is ridiculous. It's not play in the pressed-in stud but in the ball of the joint itself. It squeaks too. Looking through my FK Bearing catalog - the supplier of rod ends to CMC I believe - I identified the part as a CM10Y. Low carbon steel, no teflon liner and no load rating. It's the cheapest studded rod end they sell based on their cheapest rod end. On a critical high-load suspension part! I know it was intended to be a budget kit but I made my intentions fairly clear when talking to CMC and it might have been smart to offer an upgrade. After some discussion with an FK supplier I've ordered a pair of HJMX10T rod ends to replace them. They're much better steel, high misalignment and teflon lined. They're rated at 28,109 lbs radial load versus the non-studded version of the supplied part which is rated for 9,813 lbs. Granted, they're $41 each instead of $7 or so but I'm willing to pay that for a critical part. There's no play in any of the other rod ends in the suspension and they are a better chosen M8SB with an oiled sintered bronze lining for lubrication. I'll have to use a bolt with the new rod end but that's not such a hardship.
I also checked the front camber. My driver's side wheel is running less than the passenger side. Why? I suspect it's because of a change I made at Thunderhill when a peanut gallery insisted things didn't match and so I altered one side to shut them up. It would explain the understeer on long right turns at the track though.
The fender stays are done and I'm quite happy with them. I'll have to take them for an extended test drive to make sure I haven't cut my clearances too tight, but they fit better than the originals ever did. It was embarassing to always have the fenders cockeyed before as it made the whole car look badly assembled.
And the engine? Well, it's getting happier. Bill Cardell helped me solve a stumble on part throttle by helping to synchronise the throttle plates. I had been making changes, then blipping the throttle. He told me to hold the throttle open at the problem spot and in 5 seconds he had it dialed in. Duh. Jeremy Ferber also spent some time setting up the fuel so the engine is running pretty nicely with the throttle bodies. It's still upset on a cold start but that will come.
entry 980
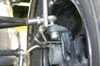 The new fender stay installed.
The big chunk of steel plate is aided by a piece of steel strap that hooks into one of the brake bolts. This prevents everything from rotating around the main mounting point. The U-shaped piece of round bar means that I can get a socket in to attach that bolt. I also have full access to the brake bleeder screw. Am I proud of this? Why, yes.
entry 981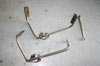 The final fender stays with the new locating tab.
It's a good thing I didn't fabricate my own frame, I'd be up to photo 3000 by now.
entry 982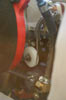 How to make a throttle cable do a 90 degree turn.
entry 983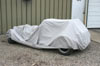 The Seven looks pretty funny under a car cover.
entry 984
September 9, 2005:
I've just had a bit of a chat with Larry at Carbotech.
He had a lot of complimentary things to say about the Porterfield R4S pads I've been using and was surprised to hear that I had complaints about the braking. His theory? I've glazed the pads over in one of my early track days due to overheating. That could be related to the blued rotors in the rear. I'll try scuffing up the pads a bit based on his recommendations but I've also ordered a set of Carbotech XP8 pads. It's similar to what Formula Ford cars run and much better suited to track use. I'm a little heavier (200 lbs) but I have a bigger pad, so hopefully it'll work out.
There is a large group of Se7ens driving across the US from Houston to San Francisco. They'll be circling around my area for a few days. I'll buzz out to visit them in Durango in a couple of weeks, then run down to Moab a few days later. It's going to be very interesting to see my car surrounded by the "real thing". Of course I have a list of things I want to do to the car before then so it's in good shape. I'd like to have a lower windscreen done but that's a matter of will on my part. I also need to sort out my bouncy headlights and possibly put in a muffler that actually, you know, muffles. First job is to get the car on the dyno with the throttle bodies and see if these bloody things are worth sorting out. They look and sound very cool but they still require a bit of attention. I've also had the tires pulled off another set of 1990 Miata wheels so I'll refinish those in black and silver like the others. These will get the Azenis tires remounted although the Seven will likely stay on the RA1 tires. Janel wants the Azenis tires for track use. Hey, I'm not going to discourage this behaviour!
entry 985
September 11, 2005:
Horsepower!
Finally, I put the Seven on the dyno. The car was not happy about the idea and did its best to convince me to rip the throttle bodies off the car and throw them away. But I'm either stubborn or a slow learned, so I did it anyway. My first run was underwhelming - 109 hp with lots of black smoke. About this time, Bill dropped by the shop to help out. So the car decided not to restart.
We eventually figured out a couple of things. One, something had been scrambled in the ECU during one of my program saves. And two, we eventually realised that in order to start, the car wanted a throttle position sensor plugged in and set so that it was off idle - but only if it wasn't hot. I can't explain that one but it got us to the point where we could consistently test the car. Bill sat down with the laptop at the dyno and started plugging away. The new injectors have a different response time than the stock ones, so while he was able to quickly able to dial in the lower load ranges by leaning out the overall fuel settings. It took a while to stuff in enough fuel to make the high power ranges work. Eventually he managed to get it rich enough (the injector response was radically different, not just a little) and the car made 146 hp at the wheels. See the dyno chart. That's the most this engine has ever produced by a fair margin, and I suspect I'll be very happy when I get the car back on its wheels. As an added bonus, the throttle bodies will (once the hood is cut for clearance) give a colder intake charge instead of the hot underhood air it's been breathing. It's quite possible that I'll find I have 20% more power on the track. Well, I'd like to think so anyhow. I'm still planning on testing the car with the long trumpets to see what difference that makes.
So what was I doing while Bill worked on my car? Helping of course. But I was distracted. Janel was also at the shop and we were stripping down two sets of wheels to be repainted. Apparently you lead an exciting life if you're a friend of mine.
Oh, and one more cool thing. Because the ECU doesn't cut fuel on closed-throttle deceleration (no throttle position sensor, it doesn't know what's going on), the Seven now shoots flame out the exhaust. Hee hee!
entry 986
September 12, 2005:
More horsepower.
Well, just a little bit. It's hard to say what the peak power is because it jitters around at the top end (mostly due to the way the dyno works) but it's definitely in the high 140's. Not bad for a 1.6! This evening I spent a bit of time comparing the short vs long runners once the fuel was dialed in a bit more. How did it do? Well, you can see the chart here. Red is the long runners, blue is the short. The long runners idle better and make a definite difference in the midrange. Right at 5000 rpm it sucked up a bunch of fuel and had to be fattened up. Above 7000 it got rich with the long pipes and was probably not flowing as much air, but it's a bit tough to tell from the charts how much less. I'll take 4 lb/ft in the midrange over a couple of hp above 7000 rpm though. This means I need to hunt down a new air filter. ITG makes one, hopefully I can find one somewhere.
So, almost time to put the beast together and drive it! Well, I'd like a hood before it goes too far. I'll build some solid motor mounts for the car tomorrow before cutting any sheetmetal. This will keep the intake from moving around as well as the exhaust. The car already has everything else bolted up solidly including the transmission so it's not a big deal.
entry 987
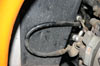 It seems that one of my tires has been chewing on the emergency brake cable.
Maybe I should tie that back.
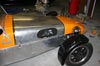
entry 988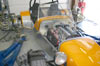 The Seven strapped to the dyno to see how the throttle bodies.
How did it do? See the dyno chart.
entry 989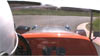 A new music video starring the Seven.
Hey, I needed to spend some time exploring Premiere. It's a big file.
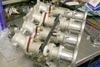
entry 990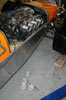 Still on the dyno, testing different length runners for the intake.
entry 991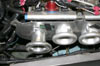 Short vs long runners.
entry 992
September 14, 2005:
If you're looking for online gambling just let me know.
My guestbook is suffering an onslaught of spam.
I've ordered a new air filter for the longer runners. It wasn't cheap and if I'd thought about it, I might have been happy with the shorties. Oh well, at least this will idle better. The starting problems have been fixed and all that remains to make the car a little more liveable is to fit a 1.6 throttle position sensor so I can use the idle switch. That will let it idle a bit better but it's actually pretty happy once warm. I also have to cut the hood and I'll probably do that tonight. Then it can be driven!
I've decided against building new solid engine mounts to prevent stress on the frame (thanks for pointing that out, Ted!). Even Caterham uses small rubber bushings as it turns out. Instead, I've installed a set of Mazda Competition motor mounts that are 40% stiffer than the existing ones (or at least, than they were originally). I took the opportunity to lighten the steel portions of the motor mounts as well. They were big enough to handle a small block Chevy before. Finally, a change that doesn't add weight to the car!
entry 993
 A view of the throttle bodies from below.
The black part is the throttle cable bracket I built.
entry 994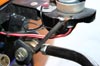 A short piece of metal and voila - no more bouncy headlights!
entry 995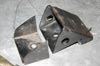 While installing the stiffer engine mounts, I decided to take some weight out of the engine mount brackets.
They were overkill before.
entry 996
September 15, 2005:
First test drive!
I feel as if the Seven has been off the road for ages. I put the second motor mount in last night and the engine is much more solidly mounted than before. There's no real increase in vibration so I think that upgrade can be called a success! The new rod ends for the upper control arms arrived yesterday and they were installed as well. Then it was time to put the hood over top of the new throttle bodies. This involved a new hole. It hurts to take a saw to my hood but seeing the filter stick out is just too cool. It's cool for intake air as well so that's good. I'm still waiting for the other filter to arrive so I only approximated the shape for now. The headlights were aligned and then it was time to roll the car out of the garage.
How did it drive? I didn't go far due to a little wiring problem with the headlights, but it seems strong. The air intake temperatures stayed low and on closed throttle I could see flashes from the flames coming out the exhaust. Tee hee hee! I still have a bit of work to do before the Se7ens USA trip comes through. A lower windshield so my car doesn't look TOO huge as well as the final hood trip. Who knows, maybe even a grille...
entry 997
 A rough cutout in the hood and it fits over the air filter.
I'll refine the shape once my other air filter is here - it's straight sided and not sausage shaped. The wrinkle at the front is some aluminum tape that I put on to protect the filter.
entry 998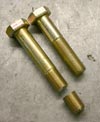 I needed a 5/8 x 3" bolt for the upper control arm.
But a standard SAE bolt of that length has too much thread and I wanted to avoid putting a load on the threads. A 5/8" x 4" bolt had the right length shank so I cut it down.
entry 999
<< | show individual entries | >>