build diary
<< | show individual entries | >>July 29, 2005: 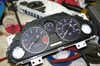 The 2002 instrument cluster is ready to install.
Well, maybe I should put the indicator for the water temperature on there somewhere. The needles sit a bit higher than in the earlier cluster so this might cause problems with the glass. The nice thing is that it's a bit lighter due to the electrically driven gauges.
entry 916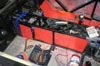 Ooooh, nice interior!
The orange poster board is being used to mock up the metal plates that will be welded into the transmission tunnel. This will both stiffen it and let me stop using the terrible-fitting transmission cover. The driver's side will be overlaid on top of the tunnel while the passenger's side needs to be welded between the bars for just that little extra clearance.
entry 917
August 1, 2005:
It was a busy weekend of fabricating.
I'm pretty happy, I accomplished more than I'd expected.
The differential mount has been finished and will definitely not move now. A piece of 3/16" plate (it might be 1/4", I forget) is welded to the side of the transmission tunnel and the baby PPF is bolted to that with 3 1/2" bolts. Some nuts are welded on the backside so it's easy to connect and disconnect. The rest of the transmission tunnel has been plated now so it looks much better, but now I have to remove the diff to pull the driveshaft. That's probably easier than the previous technique of pulling the seats and the transmission cover when I think about it. Not that anticipate much need to pull out that driveshaft.
On top of the armoring of the tunnel, I managed to get the sway bars fitted. The rear went in really nicely and is a stock 1.8 Miata rear without modifications. For the front, I shortened the arms on a stock 1.6 bar slightly. I'm proud of the mounts I built for the front bar as they're both strong (I hope) and light. They're not as pretty as I might like and I realised as I was welding them in that they're quite visible, but you can't have everything.
Last night everything was painted up and I'll be able to start reassembly tonight. Now I just have to redo a few wiring connections while I have the dash out and install my cool LED tach. I'll be driving this car again soon!
entry 918
 The cardboard templates have been replaced with steel.
The thick plate for the differential mount is visible at the back of the tunnel.
entry 919 I put an angled plate in at the back of the tunnel to allow wires and brake lines to sneak past the differential as well as tie this area together.
The welds aren't too pretty but they should work.
entry 920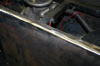 The weld at the top of the transmission tunnel was ground smooth to make it look a bit better.
entry 921 The tunnel is painted and is now ready for reassembly.
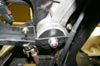
entry 922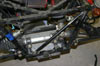 A reinforcement for the front of the car.
This should stiffen things up well. I believe this brace is required for Australian builds.
entry 923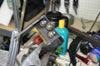 The differential mount all finished and ready for paint.
entry 924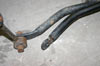 The front swaybar was shortened slightly to put the end link in a better place.
entry 925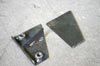 My original thought for a front swaybar mount was a simple piece of 1/4" steel.
I decided to fabricate something smarter instead. It's significantly lighter.
entry 926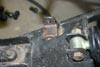 The sway bar end link for the front.
It's as far back on the control arm as possible in order to fit the stock sway bar.
entry 927
August 2, 2005:
I didn't get a lot done last night, but I did install the swaybars.
They both look as if they'll work well. There's not much clearance between the front bar and the spring - but there's enough. It'll also clear better at the regular ride height instead of full droop. I'm on track for the autocross this weekend although there's still a lot of reassembly to do first. Hopefully I'll be driving the car later this week. It'll be nice to get back behind the wheel.
entry 928
 The front bar installed.
In case the number of black pipes in the photo is confusing, it's the one just under the upper control arm. I've tried to photograph the rear bar but it likes to hide behind other parts of the suspension.
entry 929
August 3, 2005:
Big news today - the Mini is registered!
As for the other Little British Car, it got a bit of work too. The emergency brake handle is installed in the new transmission tunnel and has been moved forward a bit to allow for better adjustment of the cable. The driveshaft is back in place and the radiator is mounted. I have to buy a couple of bolts and then I'll be able to install the differential. It's close to being roadworthy again, thank goodness. I'm hoping to have the differential in tonight.
entry 930
 A peek at the rear sway bar.
This is taken from underneath the car facing up - I was lying on my back. The bar is mounted to a piece of 1" square tube that is welded to the angled plates at the rear.
entry 931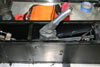 The handbrake lever in place.
Some spacers were put in place at the back to give it the correct angle leaning towards the driver.
entry 932
August 4, 2005:
Finally some decent work on the Seven.
I'm in assembly mode now. It's actually very pleasant - I'm just bolting parts in to place one after the other and making good progress. I think this is how it was supposed to work right from the start! The differential is in and very solidly mounted. The Revlight tachometer is wired up but it will not be installed in the dash until I know it works properly. The suspension is buttoned up with the exception of the sway bar end links. Those will be adjusted for no preload once the car is on the wheels. The rear bulkhead panel is 75% installed but I'll need a second set of hands to finish installing the eyebolts for the harnesses.
Speaking of harnesses, my new ones arrived yesterday. These are Willans pull-downs instead of the pull-ups I had before. The advantage is that I'll be able to adjust them more easily for other people! I'm sure my passengers will appreciate this. They're also in black for those who had easily-offended sensibilities and didn't like my old red ones. Unfortunately the sub belts missed the truck but they're coming soon.
entry 933
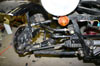
 A peek at how the differential is mounted at the sides.
I'm not convinced the U-shaped brace is really required with everything else going on, but it won't hurt. It's there to give the long bolt better location.
entry 934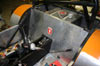 Pieces start to go back together.
The rear bulkhead panel is back on and I'm installing the eyebolts for the new harnesses.
entry 935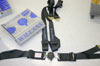 Bad picture, good harnesses.
Some Willans pull-downs to replace my old (and expired) Willans pull-ups. These will be adjustable once installed into the car, unlike the previous ones. The sub belt isn't in the picture.
entry 936
<< | show individual entries | >>