build diary
<< | show individual entries | >>May 17, 2005:
Tonight I should be able to put the car up in the air and pull the transmission cover off.
First the seats have to come out. Then I'll know just what has failed and how. I'll also have a better idea of how I can fix the failure. Thinking about it, I suspect my long bolt has simply dropped out of the slotted hole that was in the upper transmission mount. The mount was too far forward. We'll see. No matter what, I'll fix this so it can't happen again.
Since I will have the cover off the transmission tunnel I'm also going to install a new speedometer drive. The 1999 and later Miatas use an electronically driven speedo instead of the cable driven one I have now. The packaging of the transmission is such that the cable has to bend radically shortly after exiting the transmission and the first one lasted 10 miles. A new cable is obviously not the answer so I'll have to see if I can somehow manage to install and drive a later speedo. I've found a junkyard instrument cluster with some damage to the housing, perfect for my intentions.
entry 868
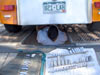 Courtesy of Jeremy Ferber, here's how my Moab trip ended.
entry 869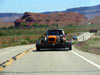 An ignominious end to a promising weekend.
entry 870
May 19, 2005:
The transmission cover is off and now the failure is visible.
The ticking noise that alerted me to the problem turns out to have been part of the parking brake assembly bouncing off the pinion flange. CMC had reported a clicking noise and loss of drive and I'd never understood where it came from. The clicking, okay. The loss of drive is still a puzzle of course.
The failure itself was the mounting bracket on the transmission tunnel. The bolt holding the diff in place was only in contact with a small area of the bracket as this was too far forward. As the diff strained to move up and down, it tore the bracket apart. It's quite possible this was a slow-motion failure that only made itself known after the diff had lifted enough to contact the parking brake.
Solutions? I have three options right now. One is to copy what CMC ended up doing and build a tubular version of the PPF. Heikki has some photos of this on his site. It will have to wiggle around the edge of the transmission tunnel and driveshaft flange but it should be possible. It doesn't look compatible with a handbrake, though. One way to make this easier would be to put a plate on the side of the transmission tunnel instead of the tubes. This would open up 3/4" or so of width and I'd probably still be able to work out a way to attach the handbrake. I don't think any cars with this solution have turned a wheel yet although it certainly should work well.
Another option would be to copy the solution developed by BSI and used on the GRM car. Again, that car hasn't really been run hard. I'd be concerned with the welded tube coming off the back of the diff but it sure would make life easy. I suspect the weight would be less than the PPF solution as well.
The third option would be to simply reinforce the bracket at the nose of the diff. Instead of a thin piece of about 1/8" plate, I'd put in something stronger. It would also be a properly located hole instead of a half-engaged slot. An extra tube would be run straight down from the side of the bracket to ensure it was well supported - possibly a plate. This might be the easiest and lightest solution. Given the amount of abuse my original setup endured I believe this would probably work well - but I do have plans to increase the horsepower of the car at some point.
I've also decided to add some stiffer bushings in the side mounts for the diff. They are able to rock back and forth a fair bit. I might also bolt on a piece of C channel to hold the other end of the bolt in place. At the moment it won't move with the diff but that will change with stiffer bushings.
entry 871
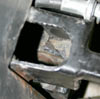 The failed differential mount.
Some parts are bent, some are torn.
entry 872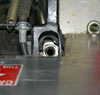 Viewed from above.
It's obvious that the diff was only mounting to a small section of this bracket. It's no wonder it failed. One suggestion has been to simply reinforce this mount to prevent cracking.
entry 873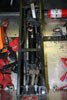 The entire transmission tunnel.
Trying to put a PPF substitute in place will be a challenge to fit. The brace would have to go past the flange (underneath the handbrake T) and then dodge around the bars on the side of the tunnel.
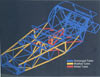
entry 874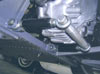 The solution designed by BSI for Grassroots Motorsports.
It would be easy to do without disassembling the car, but my car is already pulled apart. This photo is from the December 2004 issue.
entry 875
May 24, 2005:
I had a busy weekend working on everything but the Seven.
You'll be glad to know that the supercharged Miata is now happy again, my street Miata is equipped with wipers and a heater now and the GTX has a boost gauge and Momo steering wheel. That doesn't mean I wasn't thinking about the Seven, though. I've ordered some 30% stiffer springs from GAZ to allow me to play with the handling a little. Some stiffer rear differential bushings should be on the way in a few days. The down side is that I'll have to pull the diff out to install these and that is a royal pain in the butt. I'm starting to work out how I'll mount the diff. First I need to pull off the rear bulkhead panel so I can get a better look at what's under there.
entry 876
May 27, 2005:
Did you know it's possible to put Protege5 struts on a 323 GTX? No? Well, it's not exactly a bolt-on with all sorts of cutting, welding, drilling and grinding involved.
This project has kept me busy for the past few days. The car is transformed though. I'm sure all the home-built car fans are happy to hear that.
On the Seven front, I've obtained an instrument cluster from a 2001 Miata so I can use the electronic speedometer and replace my broken cable. This should be an interesting swap but I'll make it work. Somehow. The differential will get some attention shortly. I'll pull the rear bulkhead apart this weekend and come up with a final solution.
entry 877
 While the transmission is uncovered, I'm going to see if I can replace my mechanically driven speedometer (well, it would be mechanically driven if the cable would stop snapping) with this electrically driven one from a 2001 Miata.
entry 878
May 31, 2005:
I think I'm going to start customising bicycles instead of cars.
They're cheaper and easier to put together. Janel and I are working on a super-cool satin black hot-rod of a cruiser right now. Does it seem as if I'm avoiding the Seven? Well, maybe just a little bit. I have to get the nerve up to start working hard on it again.
The procrastination isn't complete, however. I pulled the scuttle and rear bulkhead off this past weekend. It's almost shocking how quickly I can disassemble this car and make it look unfinished. Removing the rear panel uncovered the bracing that's available back there. There's a lot of strength, more than enough to keep the diff tied down if the bracket itself is strong enough. I'll probably just build a stronger mount for the nose. The diff will have to come out in order for me to put new bushings in the side "arms", though. That's going to be a hassle as I have to wrestle with a 75 lb chunk of metal that is a tight fit into the frame. Oh well, if it was easy everyone would be doing it.
The scuttle was removed to give access to some of the wiring and the speedometer drive. The mechanical one has been removed and will be replaced with an electric one. Luckily, the gearing of the unit is the same as my car so it should be accurate. The hard part will be fitting the speedometer in the earlier housing. Well, not that hard. Again, if it was easy...
entry 879
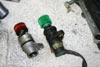 The mechanical and electronic speedometer drives.
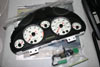
entry 880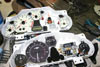 The electronic speedometer (top cluster) is much smaller than the mechanical one, mostly due to the lack of a mechanical odometer.
It also has a fairly complex mounting system of molded plastic in the housing. Luckily, the electronic version is also lower profile so I can fit it inside the older cluster by simply cutting it out and finding some way to attach it inside. Wiring will be a secondary problem but a fairly simple one.
entry 881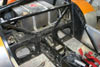 An overall view of the structure of the rear bulkhead.
entry 882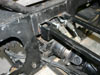 A closer view at the structure just around the differential nose, especially considering the diff mount will basically be in the same plane as the bulkhead.
There should be enough strength in here for me to use. That's not rust in the picture, simply red Moab dust.
entry 883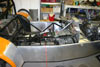 The poor Seven appears to be regressing.
entry 884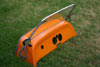 Maybe I'll hang this on my wall as art.
entry 885
June 6, 2005:
I've been busy building a Miata for the Car and Driver Superfour Challenge.
It should weigh twice as much as the Seven and have at least three times the power. It should go.
The Seven itself is awaiting new bushings for the differential and for me to get off my butt and build that new front diff mount. I did spend some time over the weekend thinking about the instrumentation, and I've decided to simply mount the 2001 cluster in the Seven instead. I'll need some new connectors to plug in to it but I can find those. More importantly, I need to replace the white gauge faces with black ones. I have a set lined up and I'll exchange them soon enough. It's a pity to lose my current gauge faces because I like the vertical style, but it's probably more useful to have a full complement of functional gauges when I think about it. I've also decided to pick up a Datatool Revlight for the sequential shift lights. They show up at a good price once in a while and it's probably cheaper than trying to build my own. Auto dimming, easy to reprogram - a very cool little unit. Let's see how it works out.
entry 886
June 9, 2005:
A post about my differential troubles to the Locost mailing list (why didn't I talk to that group earlier?) uncovered a couple of folks who have solved very similar problems in the same way I'm planning.
I have also been in contact with the new owner of the GRM car. It's been out to Thunderhill several times since I was there and he reports that installing a set of stock Miata sway bars dropped his lap time from 2:11 to 2:06. That sounds worthwhile! He also said he could take turn 1 flat out so he's faster than I am by far. His car is running on 225/45-15 Kumhos which should provide a lot of stick.
In other news, I've ordered the appropriate wiring parts I need to run the new instrument panel. It turns out the 2001 panel has a computer inside and wants a lot more information than my simpler, older one, so the connectors are bigger. Greg at Auto Vend is sending me a set - thanks! I'm not working very much on the Seven these days as various Miatas are taking up my time, but at least I'm doing a lot of planning. The final text for the book has been sent off so that's going well.
entry 887
June 13, 2005:
Finally, some time spent on the Seven!
I'm taking advantage of this down time to do a number of modifications to the car so it's going slowly. Road tests of the Caterham CSR are hitting print and EVO magazine had a very interesting photo of some frame reinforcements that were added. I can't do all of them but some are based around the transmission tunnel. There are some good photos of the frame available online as well although this may be the pre-modification version. I've started planning new tubes. After a close look, it appears that there is no easy way to put a differential mount directly over the nose of the diff so a short PPF will likely be the final solution. A plate will be welded to the side of the transmission tunnel to provide both stiffness and a mounting point. The new wiring for the instruments also arrived so I need to start working there. Now I have to decide how much of the capabilities of the new cluster I want to use - electronic odometer, turn indicator lights, etc. It's just a matter of what holes need to be cut into the dash.
entry 888
 Multimatic and Caterham made these modifications to the CSR frame and saw a 75-100% improvement in stiffness.
Hmm.
entry 889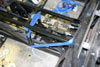 After looking at the CSR chassis, I've decided to add a couple of tubes to my own while it's exposed.
A vertical plate will be inserted above the driveshaft to help prevent twisting and (not shown) a diagonal across the top. The differential will have to be removed in order to take the driveshaft out of the frame but it was borderline before.
entry 890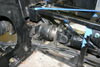 The differential mount - again.
I've changed my mind about what to do here as I'm not convinced I can anchor a mount properly right above the nose at this point. A very short PPF substitute will be brought forward and bolted to a plate that will be welded to the transmission tunnel over the side of this entire opening. The proposed diagonal bar is shown in this photo.
entry 891
<< | show individual entries | >>