build diary
<< | show individual entries | >>January 29, 2005:
Progress!
The pistons are now reinstalled in the block and the head is ready to pop on. It's satisfying work doing this but it's been a while so I'm a little rusty. My friend Bill Cardell was good enough to put up with my questions, although he'll probably be surprised to see how much I accomplished once he left! The engine is currently waiting for a gasket for the oil pump pickup - we have some at Flyin' Miata, I just have to make sure I can use one - and then will go back together. Tomorrow I'll probably work on the GTX because I'd like to be able to drive it. At this rate, the Seven will be back on the road fairly soon and with a strong engine on board. Once it's broken in, I'll hit the dyno and see how much power awaits.
entry 770
 The head, ready to be installed.
I love working on clean, well machined parts.
entry 771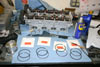 The rings are ready to be installed and the head has the cams in place.
entry 772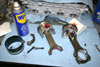 Installing the pistons.
I had considered changing these Carrillo H beam rods for A beams due to the lighter weight, but decided to keep them. The red goo is Redline assembly lubricant.
entry 773 The advantage of working at Flyin' Miata - access to tools like this digital Snap-On torque wrench.
entry 774 The piston protrusion problem has been well solved.
The head gasket will add 0.040" (1mm) to the deck.
entry 775
February 1, 2005:
Another hour or so on the engine last night and it's almost ready to install.
I think I set a record for the speed of the timing belt installation - I've never had one go on so easily. Not that I'm complaining.
entry 776
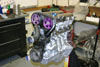 The engine is almost fully assembled.
entry 777
February 3, 2005:
It's amazing how easy it is to install the engine in this car.
I brought the hoist and engine home last night. It was late so I decided to install it some other night. Then, around 10:30, I figured it would be good to get something accomplished. I popped the engine in, bolted it to the transmission and installed the starter, alternator and most of the cooling system. All that's left is the intake manifold, the exhaust and then the usual pre-start checklist. When I wandered back into the house, it was only 11:30! If only it was always this straightforward. Painting the block silver wasn't a great idea, though. I thought it would look good with all the aluminum in the car, but it looks like paint when compared to the bare aluminum head and oil pan and the polished panels. Black would have been better. Oh well, next time it's apart I'll do that. Next time?
Once the engine is broken in, it's off to the dyno. I'll see if I can regain all the power I lost with oil consumption (oil is low octane, a particular problem for my 11:1 compression!) and maybe push it a bit further. Then I'll strap on a set of individual throttle bodies to see if I can make those work. I know they'll look great. Some good news arrived today as well - on top of the autocross scheduled for March 13th, there's also a track day in Pueblo that weekend. This time I'll be there to work on actual car setup instead of simply playing around. Before I go, I need to install the new front suspension uprights and make some new tie rods. Well, maybe. I'll see what happens to the angle of the ball joints with the higher steering arms. I'm also seriously considering making a lower windshield for the car. It's the one thing that bugs me about how the car looks. Not significantly lower, just an inch or so with a flatter top. I think it will look more purposeful. With what I learned last time, it should only take an afternoon to construct.
entry 778
February 5, 2005:
It's alive!
Again. After a bit of puttering and some spilt coolant (whoops, forgot about that little cap that's supposed to go on the back of the engine) I fired up the engine. It's a happy little unit, idling smoothly and quietly with solid oil pressure. Phew! I've driven the car around a bit and seated the rings. Boy, does it feel good to drive this car again. There are still a number of things that need to be done to get it into shape for Pueblo but right now I'm just happy to have it running around. The weather even cooperated with a warm sunny day.
If you look at the photos you'll notice I've painted the exhaust black. The silver never really worked well visually because it matched the bodywork too well. It also picked up all the dirt thrown by the front wheel and the slight leaks on the slip-on collector left black smears all over. So now it matches the wheels and the black hides the carbon. I'm quite happy with how it looks. With all that done, it's time to go skiing for a few days.
entry 779
 Just for fun, I decided to paint the exhaust black instead of silver.
It looks much better - particularly where the slip-on collector leaks.
entry 780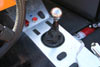 A small touch, but one I've really come to appreciate.
A bit of vacuum hose around the edge of the cutout for the shift lever cleans things up beautifully.
entry 781
February 9, 2005:
You'll be glad to know that the skiing was good last weekend.
But even more fun was this afternoon. Jeremy (a coworker) and I headed out to the local twisties to take some action shots. To make the car look good, I spent a bit of time polishing the body last night with Nevr Dull. It was a fairly quick job but it sure livened up the little beastie! None of the photos I've put on the site really show it off. To do a proper polish will require a lot more effort but this is good enough for the winter sun. The engine was happy and felt strong, while the new tires were extremely grippy. That's all good, then.
Why were we taking action shots when we should have been at work? Well, we needed something for the cover of the book. Yes, I'm working on a book about the Seven. The title isn't fixed yet, but it will be a combination of a build diary and a technical how-to on how to build a homebuilt or kit car. A combination of this website and the tech help I've been giving out by email. Call it an entertaining reference book. It should be on the shelves at the beginning of November - I'll be a little busy for the next two months!
I was goofing around on Google last night and came across this car. It's actually a little spooky. I would not be surprised to hear that's the same paint I used. Even the steering wheel is the same. There's some nice work on the car. I particularly like the dashboard.
entry 782
 One of my favourite photos of the Seven.
I'm grinning like an idiot.
entry 783 It sure is hard work driving for photographers.
Jeremy Ferber was behind the lens.
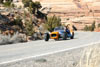
entry 784 Something about this shot makes it look like vintage racing to me.
Not the background, the pose of the car!
entry 785
February 13, 2005:
Yesterday was spent in the shop, working on the front end.
I've been concerned about my tie rods for some time. Specifically about the angle reached by the rod ends at full droop. Close examination proved my worries were well founded. The rod ends were acting as a limiter on the suspension travel. This isn't good - eventually the rod end tires of this game and breaks. Much excitement ensues.
A few weeks ago, I tracked down some 1999 Miata steering knuckles. They had a slightly higher steering arm to help this problem. I also decided at the same time to change over to ball joints instead of rod ends. They're not as adjustable as the rod ends, but they are more durable and were designed for this specific use. This meant new tie rods. No problem, I had a few of those.
Imagine my surprise when I discovered that Mazda apparently used two different sized threads on their tie rod inner joints. I figure the most recent set I'd picked up were from a 1999 or later car. I discovered this after I'd cut one in half, of course. One of my "new" tie rods had the larger thread I needed but I was forced to cut up one of my rod end versions for the other. I wasn't planning on using it again but it would have been nice to have the option!
It took a bit of time, but I'm much happier about the steering setup. It seems to be just as sharp as before and there is absolutely no slack or clunk if I wiggle the wheel at a standstill. On the road I feel as if I'm getting more kickback but that must be my imagination.
entry 786
 The steering at full droop.
The rod end is acting as a limiter - not good!
entry 787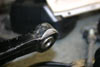 Despite some grinding I'd done, it's obvious the rod end is chewing on the steering arm.
There were marks on the rod end as well.
entry 788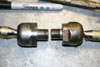 Surprise! Mazda has used two different inner tie rod threads over the years.
entry 789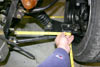 Measuring the length of the tie rods.
The steering rack was centered and a ball joint was installed on the steering arm. The wheels were set to 0 toe and the distance from the rack to the inside of the ball joint was measured. The tie rod was built about 7mm longer to allow for adjustment.
entry 790 The new ball joints installed, along with new uprights painted a nice satin black.
entry 791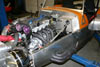 I'm very happy with the black exhaust.
It hides a number of sins and looks great.
entry 792
<< | show individual entries | >>