build diary
<< | show individual entries | >>December 9, 2004:
For light entertainment, try reading the warnings on the back of a can of aircraft paint stripper sometime.
Yikes. I put on my brave pants (and solvent-proof gloves) and decided to go ahead anyhow. The first indications were promising with lots of bubbling paint that easily scrubbed off. But if you look carefully at a Miata wheel, you'll see that the rim and a face on the spokes is machined while the rest has a sand texture. The paint/powdercoat/whatever on the wheel is very well adhered to this textured surface. Four rounds with the stripper and I still couldn't get it clean. It may be time for some sort of media blasting. At least I did manage to remove a fairly copious amount of paint. Ever wonder why you never see a Miata with peeling paint on the wheels? It's obvious to me now!
entry 713

December 10, 2004: 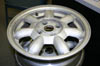 The wheels with tires removed.
They're dirty with a few scuffs but I think they'll look great when I'm done.
entry 714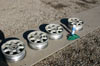 The first step in stripping the wheels - aircraft paint stripper.
entry 715 Looks promising, the factory paint is bubbling up nicely.
entry 716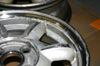 After several rounds with stripper, this is the result.
The polished rim is mostly clean as are the polished edges of the spokes - but the textured part of the wheel is not giving up.
entry 717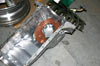 My new oil pan is back from being hot-tanked.
At least something is cleaning up!
entry 718
December 11, 2004: 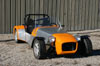 Finally, a decent photo of the car with the windshield.
I'm still considering building another that's a bit lower.
entry 719 Every time I clean the car, it rains.
The last cleaning - the best so far - caused record snowfall. So it's going to stay dirty for a while so I can use it.
entry 720
December 13, 2004:
Better stripper.
I've been told via email and the guestbook that my paint stripper was not manly enough. The key is to use the semi-gelled type that paints on. The paint shop that recommended the spray-on stuff was wrong! Once again, after finding the pros didn't quite have what I needed I headed for Lowes. A bottle of Jasco stripper cost less than a single spray can and it definitely did the job. Combined with a solvent-proof brush from Walmart, a Scotch Brite pad and a not-solvent-proof scraper I was able to make a huge difference to the wheels. Tomorrow I'll see how they paint. Thanks to Richard and Jonathan for the tips.
I was busy over the weekend driving. I brought a video camera along and I've put some pretty fun videos together. Nothing fancy (yet), just some back road driving. This will give you a hint of the sort of roads that we have right on the edge of town. They sure look fast in the little versions, holy cow. Want to see them?
entry 721
December 14, 2004: 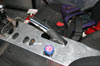 Not the biggest installation, but a Voodoo brake handle has replaced the plastic one.
Hey, it matches the car. My titanium shift knob also made it onto the car. Why? Because I like it.
entry 722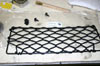 A future installation - this net from BMW.
It'll go on the passenger's side of the transmission tunnel to corral loose papers and sunglasses.
entry 723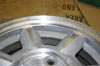 The gelled stripper did the job.
A couple of drops of water mar the finish here, but you can see the difference from the earlier stuff. That's a clean wheel!
entry 724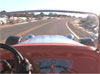 More videos!
These are some fun ones to watch. Watch the videos here.
entry 725
December 15, 2004:
I'll be painting the wheels with Dupli-Color "High Performance Wheel Coating", whatever that is exactly.
It's available in clear, silver, graphite, bronze or satin black according to the website. Well, I decided to go with satin although it's hard to find. My local NAPA put in an order and bronze showed up. The part number was correct, the paint just wasn't right. So for fun, I had them ship two cans of "bronze". Guess what? It's black. Not satin but flat black. Since the clearcoat will add a bit of gloss I decided to go with this. It was a close call, I almost decided on graphite. Let's hope it turns out well. For the record, order part number HP104 for black and HP105 for bronze. First I have to polish the rims - and by that, I don't mean the entire wheel. I mean the actual rim of the wheel. The popular vernacular seems to have lost the distinction. But I digress. Some kerb marks need to be removed and then it's just a matter of making everything super-shiny. I'll put clearcoat over the polish too because I'm lazy. Thanks to Jonathan Adams for much advice on how to do this.
entry 726
December 16, 2004:
Well, the painting comment was premature.
I have to finish polishing the wheels first. Or would the more appropriate term be "start"? Anyhow, I'm going to put the Seven on a lift and use it as a 130 hp lathe to spin the wheels for me. That should help to get a nice even finish on the kerbed sections. I've tried hitting a test spot with a Scotch Brite doodad (looks like some sort of sphere made out of blocks, used for porting heads) on a die grinder and while that works a treat, it also has the effect of slightly flattening the area. Not a problem when it's painted but it will make the polished section look dented. Okay, they're not the best wheels to start with but there's no reason to exaggerate that. So I'll try a couple of other tacks. I just need 1) the enthusiasm and 2) access to the lift. This weekend.
While it's up in the air, I'm going to raise the ride height a bit. I forget that all of my "eyeballing" of ride height has been done with the car empty. With me in it, the rear is sinking by 1/2" or so. With two on board, it's worse. So I'll compensate for that. I'm also going to cornerweight the car and see if I can get it nicely balanced. The only question is - set it up for one or for two?
entry 727
December 17, 2004:
A bit of polishing tonight.
I put the Seven up on the lift and used it as a lathe. That works pretty well but it's hard to get right in to the corner by the spokes without your fingers going bonk bonk bonk. I don't have the perfect mirror finish yet - it's still more of a satin - but it's looking pretty nice. It's the shiniest thing on the car by far right now! I first hit the spinning wheel with the Scotch Brite bit on a Dremel to bring down the high points. I don't think I can dig it down to the point of removing all the marks but it looks much better. Maybe some coarse sandpaper? The bit was followed with a Scotch Brite pad and then polish, but this still left some "grain". I tried again with 2000 grit wet/dry sandpaper left over from when I finished the paint on the Cadillac then hit it with the Meguiars polish. Much better. I think I need one more intermediate step with something a little more aggressive than the Meguiars but even as it is it would look blinding in the sun.
I added a short short video clip of what it's like to pass on a country road. Pretty quick! The videos are now in a more Mac-friendly format, my apologies to those of you with OS X. This weekend is supposed to be nice, I'll head back out again with the camera.
entry 728
 How do you polish wheel rims? With a 130 hp lathe of course!
entry 729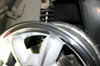 You can see the current finish on the rim along with the worst of the kerbing.
Ouch.
entry 730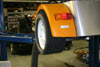 Hey, Grassroots put a photo of their car in the magazine with tires that wouldn't clear the fenders.
So I'll go one bigger. Actually, several sizes bigger. That's a Goodyear 23x10 race slick. Nope, it's not even close. I'll need a spacer just to clear the spring.
entry 731
December 18, 2004:
There are so many things I should be doing instead of playing with my Seven.
But I'm not.
The wheels are polished. The solution to the nasty kerb scars was an 80 grit flapper wheel on a die grinder. Overkill perhaps, but it sure did the trick. This was followed with some 220 grit to clean things up, then some coarse and fine Scotch Brite wheels. A rub with a coarse Scotch Brite pad put a nice satin finish on things, then I wet-sanded with 600, 1000 and 2000 grit. Some rubbing compound (the missing link from yesterday), aluminum polish and a final shot with Nevr-Dull wadding and boom! A very shiny wheel. It turns out I started with the worst wheel of the lot. Two had no kerb marks at all and those cleaned up in about 30 minutes. I did all the work with the wheel spinning to avoid variations in the shape of the rim. With the polish, those would have been very obvious.
So after all the polishing, I cleaned everyhing up with brake cleaner, carefully masked the rims and started painting. Two coats of self-etching primer, two coats of the Dupli-Color and then a coat or two of clear. How will it look? Hard to say, I'm heading off to put the second coat of black on right now.
While waiting for paint to dry (how exciting!) I checked a few things on teh car. The connection between the upper control arm and the upright was backing out a bit, so I tightened that up after taking out a bit of camber. I also raised the ride height by about 1/2" to give me some more peace of mind. Just for fun I threw the car on the scales - the cross weights are 50.2/49.8 with me in the driver's seat. Not bad for an eyeball setting, really!
entry 732
 The final polish result.
The wheel on the right hasn't been done yet, the wheel on the left is finished.
entry 733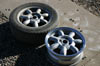 A before and after.
Hmm, the "new" wheels look pretty good.
entry 734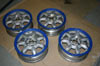 The polished rim is masked off and the wheels are ready for paint.
entry 735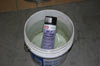 Warming the cans in hot water helps give a better quality coat.
As you can tell, I'm starting with some self-etching primer.
entry 736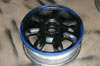 Primed, ready for the black.
It's hard to tell what's fresh paint and what's primer!
entry 737
<< | show individual entries | >>