build diary
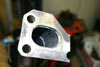
<< | show individual entries | >>July 16, 2004: 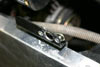 The Dzus spring is riveted in place.
entry 474
July 18, 2004:
Whew.
Saturday was a lot of cutting and fitting. I decided to tackle the header as it's the last big job remaining. Armed with a chop saw, a grinder, a welder and a lot of patience I managed to get all four runners built. They're only tack-welded together and are still missing an exhaust flange, but the hard part is done. I have to say that I'm very proud of this. I managed to get three of the runners at the ideal length and the other is only 10mm longer. It looks good and should help my engine breathe as well as possible. There's no way I could have honestly built this any other way than by cutting and welding u-bends. It's also just as well I wasn't paying someone else by the hour - it took me at least 8 hours to get it done! Now I just have to finish the rest of the exhaust...
About those ill-fitting aluminum panels. Both my friend Eric and I realised at the same time that the problem pieces are those that are probably exclusive to the Miata kit. Steve at CMC mentioned that they were mocked up on that 2-day GRM build in the shop. Sounds as if there were some time pressures...
entry 475
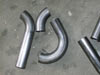 Time for some header construction! Here are the pieces for the #4 runner.
entry 476 The #4 runner in place.
entry 477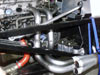 The #3 runner is done.
I'm not thrilled about a small kink in this one, mostly from an aesthetic point of view.
entry 478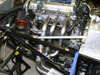 The #2 runner.
entry 479 I decided to move the #2 runner to #1.
I thought I had the ideal routing but this works better.
entry 480 #1 does get a little close to the brake line.
I'll build a shield for this.
entry 481 Cutting and more cutting.
entry 482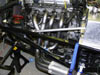 The complete header!
entry 483 The only compromise I had to make in length.
About 10mm (3/8") of extra length in the #2 runner. Reaching that position in the collector proved to be very challenging.
entry 484
July 19, 2004:
The exhaust system is complete!
Well, almost. I still have to open up the holes in the flange for the larger 2.5" tube, but then I can start welding everything together permanently. Hopefully without any real distortion! I'm still quite chuffed about how the header turned out - I can see a couple of small changes I'd make now, but nothing that makes it worth reworking. The muffler has been hung beside the driver and I've even managed to put together a tip. Soon enough I'll discover just how loud this thing is! Since a few people have asked, the individual runners for the header will remain individual. The join at the collector is a slip joint. While it will be a little more prone to leaking this will make it possible to remove and replace the header without pulling the engine!
As a short break from all the cutting and welding, I also fitted the tail lights to the car. It's coming together now, and quickly. I'm almost ready to send the body parts off for painting.
entry 485
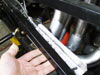 My heat-shielded brake line.
An aluminum shield plus reflective wrap. This should do the trick.
entry 486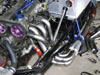 Another view of the header.
entry 487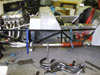 The complete exhaust system is in place.
entry 488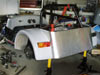 A change from all the exhaust system photos, here's the rear of the car.
The tails are straight, they just look funky in the photo.
entry 489
July 20, 2004:
In order to put the 1.75" tubes into my modified stock exhaust flange, I had to open up the holes a fair bit.
Now I just have to squash the tubes down and weld them in. Then the entire exhaust will start getting welded together - hopefully without distortion!
To take a break from all the cutting and welding, I wired up the taillights. It's so childish to get excited over flashing turn indicators but that didn't stop me. The brake lights, turns, hazards and tails all work. Now I need a decent looking reverse light and a license plate light. I also have to decide where the plate is going to go - it's big on this little car!
entry 490
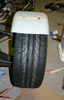 A test fit of a +38mm wheel with a 205/50-15 tire.
The tire is pressed up hard against the edge of the bracket for the fender. Some modification would be needed!
entry 491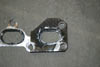 The stock exhaust flange is opened up to fit the 1.75" tube I'm using.
This needs to be brought down a little once the tube is welded into place - look at the size of the port in the gasket!
entry 492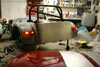 Taillights are working!
entry 493
July 21, 2004:
Not one of my more successful evenings.
I squashed the header tubes down to fit into the flanges and did a little more tack welding to hold the pipes in place. Then just for fun I decided to start doing the final bead on the tubes - and hit my limitations as a welder. After blowing a few holes in the tubes I decided to hand it over to Brian so he can TIG it. I was not happy with myself. Instead of installing the new mirrors I called it a night and turned my attention elsewhere.
Geoff Davis tells me he is reluctantly having to sell his Seven kit. For some more information, check out my CMC kit for sale page. It's available right now and would be a great opportunity for someone who's interested in doing the same thing I am without the wait for CMC to build a frame.
entry 494
 One of the header tubes squashed down into the flange.
entry 495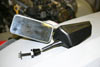 The mirrors! The hardest part will be mounting them high enough to clear the rear fenders.
entry 496
<< | show individual entries | >>