build diary
<< | show individual entries | >>July 16, 2004:  This is the best alignment I could manage for the aluminum panels on the passenger's side.
It's also very visible once the car is completed.
entry 463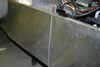 By comparison to the transmission tunnel, here is the fitment of the side body panels.
This seam is so tight it doesn't need any rivets.
entry 464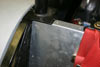 The rear bulkhead panel was almost perfectly shaped.
entry 465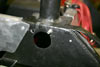 There's a hole drilled in this plate that's right where I wanted to put a bolt to hold on the rear fender.
I suspect the hole is left over from the original Locost frame design, as this is a shock mount in that setup. The bolt hole I had to drill didn't have much room for error. The unoccupied 1/4" hole is inaccessible from the other side - whoops.
entry 466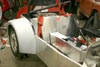 The first rear fender in place.
You can also see the fitment of the transmission cover here.
entry 467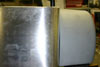 Marking out the location for the taillights.
It's a good thing I had a level or these would have been far off!
entry 468 The front fenders in place.
These will cover a 205 tire but the offset needs to be correct.
entry 469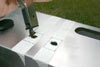 Using a nibbler to create the holes for the console switches.
This was much easier than I had feared.
entry 470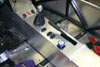 All controls in place!
In front of the gearshift from left: Ignition, starter button, hazard lights. Behind the shifter, turn indicator, headlights, high/low switch and brake bias adjuster. The piece of tape marks out one of the crossbars in the transmission tunnel.
entry 471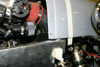 Installing the Dzus fastener for the nose cone.
First, drill a hole through both parts so that the end result is aligned.
entry 472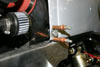 The Dzus fastener temporarily held in place.
The countersunk hole gets quite close to the trailing edge of the nose cone. This recessed lip on the nose really could be 1/2" longer to make this easier to fit.
entry 473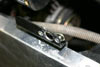 The Dzus spring is riveted in place.
entry 474
July 18, 2004:
Whew.
Saturday was a lot of cutting and fitting. I decided to tackle the header as it's the last big job remaining. Armed with a chop saw, a grinder, a welder and a lot of patience I managed to get all four runners built. They're only tack-welded together and are still missing an exhaust flange, but the hard part is done. I have to say that I'm very proud of this. I managed to get three of the runners at the ideal length and the other is only 10mm longer. It looks good and should help my engine breathe as well as possible. There's no way I could have honestly built this any other way than by cutting and welding u-bends. It's also just as well I wasn't paying someone else by the hour - it took me at least 8 hours to get it done! Now I just have to finish the rest of the exhaust...
About those ill-fitting aluminum panels. Both my friend Eric and I realised at the same time that the problem pieces are those that are probably exclusive to the Miata kit. Steve at CMC mentioned that they were mocked up on that 2-day GRM build in the shop. Sounds as if there were some time pressures...
entry 475
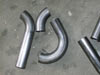 Time for some header construction! Here are the pieces for the #4 runner.
entry 476 The #4 runner in place.
entry 477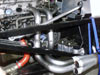 The #3 runner is done.
I'm not thrilled about a small kink in this one, mostly from an aesthetic point of view.
entry 478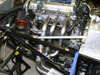 The #2 runner.
entry 479 I decided to move the #2 runner to #1.
I thought I had the ideal routing but this works better.
entry 480 #1 does get a little close to the brake line.
I'll build a shield for this.
entry 481 Cutting and more cutting.
entry 482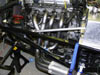 The complete header!
entry 483 The only compromise I had to make in length.
About 10mm (3/8") of extra length in the #2 runner. Reaching that position in the collector proved to be very challenging.
entry 484
<< | show individual entries | >>