build diary
<< | show individual entries | >>July 4, 2004: 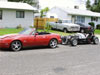 I expected the Seven to look smaller, but it's big for this type of car.
entry 415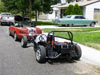 No, we didn't bother aligning the steering wheel.
entry 416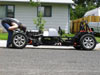 Not a big car.
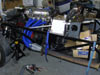
Brian checks out a leaking coolant line.
entry 417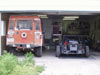 The Land Rover and the Seven.
Somehow I don't think it's going to be difficult to decide which one to take for a given trip.
entry 418
July 6, 2004:
After all the excitement of the first drive on the 4th, I took the day off to do other things.
Well, mostly. I did find the time to change the upper control arm on the right rear wheel. I had to replace the right rear upper arm when the original was found to have a misaligned bracket. Well, the bracket that was used for the replacement was drilled further out than the original arm for the left side. Luckily the left side part will fit the right if it's flipped upside down. Installing it gave me an extra 1.5 degrees of negative camber, putting the alignment right where I wanted it.
entry 419
 Building the steering wheel adaptor.
entry 420 The steering wheel adaptor installed.
It's fairly minimalist!
entry 421 Here's why there was no negative camber in one wheel.
These are two upper control arms compared. The one with rod ends in it is too long.
entry 422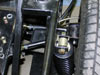 The original left side upper control is flipped upside down and mounted on the right wheel.
This gave an extra 1.5 degrees of negative camber, putting the car right where I wanted it.
entry 423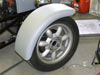 Test fitting a front fender.
entry 424
July 7, 2004:
I chopped up the factory exhaust manifold last night.
I'm not sure if I want to use the collector from it or not. I could obviously do better but I certainly couldn't pay less! 10 feet of pool hose is being used to mock up the header and determine pipe routing but it's a bit like wrestling a blue octopus that's lost a few tentacles. This is the first time I've tried to build a header of any sort and it's obviously a bit of an art.
entry 425
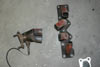 The factory exhaust manifold comes apart.
Reluctantly.
entry 426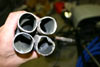 The 4-1 collector for the factory manifold.
Not too bad for a free part.
entry 427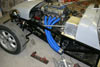 Using pool hose to mock up the header.
It's quite a challenge getting everything tucked into place.
entry 428
July 8, 2004:
I can feel a thrash looming.
If I want to have this car on the track at the Flyin' Miata Open House in late August, I need to get a few things sorted. Time to get down to work!
The first step is the header. After some playing with pool tubing, I've managed to figure out the best hose routing and arrangement. It was very interesting work as I've never done anything quite like this before. My little Caterham model provided a certain amount of inspiration and confirmed my choice of where to pass through the frame. However, the engine in my car sits much further back than in a Caterham so it was only a starting point. I ended up arranging the pipes differently in the collector. Keith Armstrong also provided me with a link to a wonderful website showing two Caterham exhausts. Of course, I received his email after I'd come up with my design! It wouldn't have changed much, as you can see the difference in engine location from that page. But it has inspired me to try one more change to the #1 tube.
I also decided to pull the radiator to fix a small leak where I had moved one of the fittings. I didn't think this through completely and the entire cooling system drained onto the floor through the water pump outlet. Of course the car is too low to put any sort of pan under there at short notice...
entry 429
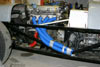 The first attempt at a header design.
The arrangement of pipes is the same as the Caterham 4-1 but it's going above the frame diagonal.
entry 430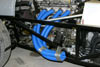 Attempt number 2 at a header.
This is a basic copy of the Caterham 4-1.
entry 431 The best pipe arrangement for the header.
entry 432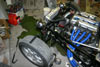 The coolant drained out through the water pump inlet when I disconnected the hose!
I was concerned about the hose on the radiator. Whoops.
entry 433
July 9, 2004:
Brian has a friend who owns a mandrel bender.
The Seven may be going on a little field trip this weekend so we can make the exhaust in that shop. That sure would make life easy so I hope it works out!
I spent last night working on little things. The holes for the passenger's seat base have been drilled - even with all the modifications to the seat, it's still a tight, tight fit and I may have to "clearance" the transmission tunnel a little. I started working on the wiring for the headlight, hazard and turn indicator switches until I ran out of wiring parts. I also reinstalled the radiator, filled it up...then had to remove it again. Turns out I had misidentified the leak. It should be fixed THIS time. I made another mess with the coolant but nowhere near as much as last time.
entry 434
July 10, 2004:
Unfortunately, the plans to visit the shop with the mandrel bender fell through.
The bender has been sold. So I'm back to the original plan of cutting up pre-made bends. Too bad. I expect to ruin a few bends while doing this. I've been working on the wiring in the meantime, getting the final switches in place. Once the transmission tunnel gets here (next week, it's on the way) I'll be able to start assembling big chunks of car. I am tempted to put the side panels on one side of the car so that I can fit the rear fender. This means I can also mount the taillights and start finishing up that particular wiring. First I have to figure out which of the rear fenders is which - they're asymmetrical. I have a number of photos of various CMC builds that should help here.
Interesting note - looking through those old CMC photos, it appears they run their exhaust above the diagonal frame member. That's the first routing I tried but I had trouble getting it to work to my satisfaction. It also put the exhaust close to the master cylinders - but without the change I made to the water pump inlet, it would have been the only option. I also notice that CMC had to cut a new hole for the throttle cable bracket ain the Mitty build as well!
entry 435
 More header mockups.
entry 436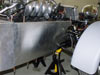 I'm trying to get up the nerve to attach one of the side panels.
If I have to take it off again, it will have to be drilled out.
entry 437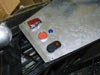 The first of the main switches has been added to the car.
These black rockers will be used for the turn indicators, headlights, high/low switch and the hazards. The others will be placed along the transmission cover. This one is the hazard lights and it's currently turned on - thus the illuminated LED.
entry 438
<< | show individual entries | >>