build diary
<< | show individual entries | >>June 16, 2004: 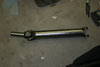 It's so cute! The partially-completed driveshaft.
entry 383
June 17, 2004:
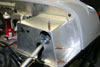
The driveshaft is finished and in the car.
Talk about a tight fit! I had to disconnect the parking brake cables but that's all - that was a relief. If the shaft was even a tiny bit larger in any direction I would have been out of luck, too. But it fits! Once it was in, I fired up the engine and got a feel for the clutch travel needed. Big moment - I have a complete drivetrain! The rear wheels happily spun as I let the clutch out with the car in gear. Vroom vroom!
entry 384
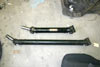 The finished driveshaft, compared with a stock 1.8 Miata part.
My new one is surprisingly heavy but it's sure not going to break! Check out the size of those yokes.
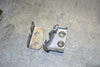
entry 385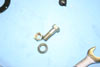 1.6 and 1.8 Miatas use different size bolts for the flange on the diff.
Make sure you've got the correct ones. Buy the (unusual) bolt from Mazda but get the washer and nut somewhere else - they're expensive!
entry 386 The driveshaft in place.
entry 387
June 18, 2004:
I'm heading out of town this weekend to play with Basil and go to a music festival in Telluride.
So anyone reading this is going to have to make their own fun! I did put together a way to step through the build photos one by one, though. You can also pick a random shot just for fun. Someday I'll set it up so that it remembers the last one you looked at, so you can simply check in to see what's new. But maybe later - this is all homebrew stuff, and I want to do something else now. Check it out!
entry 388
June 21, 2004:
Now that driving the car is looking like a possibility in the future, I called the Colorado DMV to find out what's involved in getting it licensed.
First, the Colorado DMV is extremely easy to reach and very helpful. I didn't have to wait at all! Unfortunately, it gets harder from here. I can't start the process until the car is street legal. Then it will be a 2-3 week process if I manage to get all my paperwork together. Most importantly, I need receipts for all the major components such as the engine, tranny, frame, body parts (I suspect they were picturing a slightly more complex car with that one) and rear end. I can easily get the receipts for the tranny and rear end. The engine will be a little more difficult as the core was bought from a junkyard at least 4 years ago. I realize now that I also have no receipt, MSO or any paperwork for the frame and body from CMC. Time to leave a message with them and see if they'll return it - I'm also waiting for my transmission cover. They haven't been too responsive lately.
The driver's seat is bolted in to place. I've got the placement of the pedals perfectly set. Now I just need to put in the gas pedal and make the steering wheel adaptor.
entry 389
June 22, 2004:
I decided to hook up the throttle pedal last night.
I think I've got pretty good pedal placement but that will be confirmed later. I also put together the box that covers the steering column and top of the pedal. The dimensions were pretty good but one of the bends wasn't done on a break and I had to do a bit of hammering to get things to fit. It'll stay in shape when the rivets are popped into place. The rectangular hole for the throttle cable was both in the wrong place and too big - the cable wouldn't snap into place. It was easy enough to rectify this. I'll need to fabricate a different throttle cable bracket as well, as the Miata one is too far back for this setup. But now all I need is a steering wheel and I can play Race Car Driver with a working gearshift, brakes and throttle!
I just had a chat with Larry at OK Miata. They've put together one of these cars with an eye towards customer buildups. The final weight ended up at just over 1200 lbs and they've used a number of the same parts I have. They also report breaking the differential mounts almost immediately...
entry 390
 The steering column/pedal cover.
The big hole is for the Miata wiring harness - not that I have one.
entry 391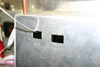 The hole on the right is the one that was in this cover.
The one on the left is the one I cut in the correct place to the correct size.
entry 392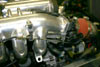 Whoops, someone's going to need a new throttle cable bracket.
entry 393
June 24, 2004:
Don't expect a whole lot of action for the next little while.
My parents are visiting from Canada. Mom was very happy to see that the Seven appeared more substantial than she had originally feared. Meanwhile, I'm trying to get in touch with CMC for the paperwork for my frame...
entry 394
June 25, 2004:
I've heard from CMC.
My transmission cover and MSO should be shipping today or Monday. Excellent news.
entry 395
June 30, 2004:
Okay, my parents are gone.
It's time to get back to work! Last night I puttered around. The passenger's seat is partially bolted in, I've made measurements for the throttle cable, picked up a coolant fitting that's going to be tweaked a little, prepped the fan for mounting and located a stock exhaust manifold to act as a base for my header. It's fun running a high-flow fan when it's just sitting on the floor. Dusty, too...
entry 396
July 1, 2004:
Happy Canada Day!
Last night was spent making brackets and cutting things up a little. I'm going to modify the water pump inlet to give me maximum room for the exhaust system so that got cut in half. Fittings for the fan brackets and radiator brackets were also put together. The fan I'm using is a Permacool 12" "high performance" fan. It's not as strong as the Spal fans that we use on our super Miatas, but it should do the trick nicely in conjunction with the massive radiator. I can set the trigger temperature of the fan to anything I'd like so it can come on quite early.
While looking for photos of roller barrel throttles I came across this build diary - a seven-day Caterham R300 build. It's a fun read - and check out the complexity of that header! I have my work cut out for me. There are lots of good detail shots of how Caterham puts various bits together. The diff is a nice little piece that's not mounted in any exotic way, but all mount points are ahead of the driveshafts and perhaps that's the key - check out day 2 for a good picture.
entry 397
 The new throttle cable bracket.
You know, it doesn't look a whole lot different!
entry 398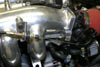 The new bracket in place.
I could have flipped the existing one, but it would have sat quite high and probably interfered with the hood.
entry 399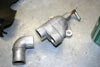 To give more clearance for the exhaust, one of the water fittings will be tweaked.
entry 400 Bracket locations for the radiator.
entry 401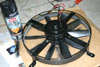 My fan will be a "pusher", sitting in front of the radiator.
Since the motor was golden in colour, I decided to make it a little more subtle.
entry 402
July 2, 2004:
Whoops, no argon for the welder.
So instead I spent a bit of time fitting the throttle cable bracket, drilling one of the side body panels and measuring a piece of aluminum to fit under the front of the nose. This last piece will both stiffen the nose and aid cooling.
entry 403