build diary
<< | show individual entries | >>June 7, 2004:  Fitting the first of the internal body panels.
entry 346 Another colour mockup, based on Jamie Ruderman's suggestion.
entry 347
June 8, 2004:
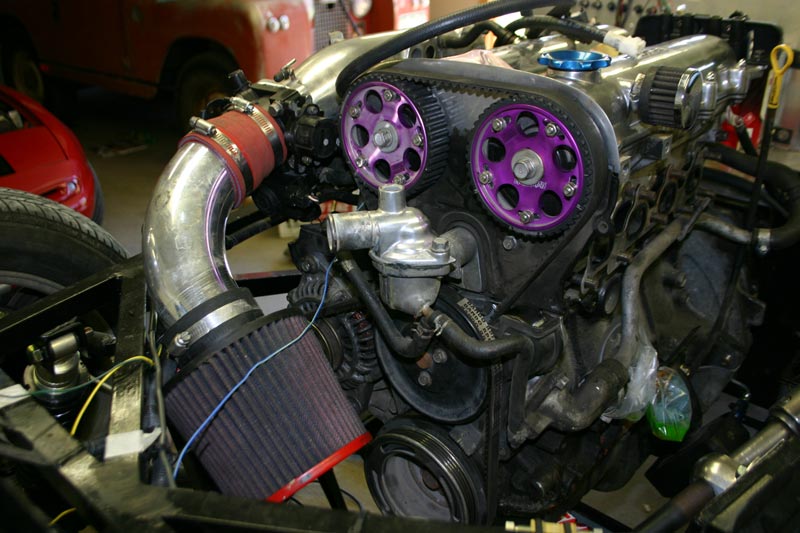
The fuel system is buttoned up and ready to be tested.
That could be messy. Hopefully not! I also brought my driveshaft in to a local shop to get it shortened and was told that it was impossible to do after an estimate of $200-$250. Well, that's not what I wanted to hear! I know it's possible because it's been done.
Packages have been arrving from all over. A new set of gauge faces, a copy of "Lotus Seven and the Independents" as well as a kit car assembly CD from YourKitCar.com. I'll let everyone know how useful/interesting the latter two are once I've had the chance to properly peruse them but the book is very interesting to flip through. CMC gets a good mention. The radiator should be here today. Ooooo, this is exciting. I'm actually getting close to the point where a test drive would be possible. A very noisy, unmuffled test drive. Just like the first time I took Basil out. Hopefully with a functioning clutch and brakes this time.
entry 348
June 9, 2004:
My new gauge faces are in place.
They're from Viper S. Custom. Up close, the printing is not as sharp as some of the other gauge faces on the market but the combination of the cost, the availability and the different designs makes this irrelevant. Once installed, they look great. They even came with new bulbs for white nighttime lighting. I only ordered a partial set because, well, I'm only using a few of the gauges!
Back to driveshafts. I can either send the shaft off to CMC's shop to have it shortened for $100 plus shipping. Or I can have a full custom shaft made locally for $260. I'm leaning towards the latter, as it'll come with new u-joints, leave me with a good 1.8 driveshaft that I can sell and I'll be able to go visit the shop if there's a problem. Besides, this thing will be spinning at 7000 rpm right beside my hip. Is that really where I want to save $100 or less?
entry 349
 My new gauges.
entry 350 The gauges in place.
The driving environment is starting to take shape now.
entry 351 There's no way this panel is going in to place as is.
entry 352 A tip I picked up from my friend Steve.
You can run the fuel injection wiring underneath the intake manifold for a super-clean look.
entry 353
June 10, 2004:
The radiator arrived and I've done some test fitting.
It's a BIG radiator and only barely fits inside the nosecone! Beautifully made and light to boot. There should be no cooling problems with this thing. Now, it's my understanding that this is the big radiator that is sold by CMC although I didn't get it through them. If it is the same one, it's not used with the Miata frame. The lower outlet interferes badly with the front suspension mounting points. This will be fixed by moving the outlet to a different place - not cheap, given that the radiator is epoxied together at the bottom. It would have been cheaper to get a custom radiator made by this point. I also had to modify the radiator mounting bracket fairly heavily, to the point where I think I'll just cut it off and start over. My frame was supposed to be prepared for the big radiator but it obviously wasn't. The verdict? I should have bought the rad from CMC - assuming it's different - or just gone with the smaller, cheaper economy rad that they've used in all the other "Miata" builds. Still, I do live in the desert so cooling is important. The modified radiator will be ready by the middle of next week.
entry 354
 Hmm, do you think the radiator box was big enough?
entry 355 The radiator mounted on the car.
It had to be leaned back to clear the nose cone. It's mounted backwards here for testing.
entry 356 The lower outlet pipe wants to be in the same place as the suspension pickup - the radiator is backwards in this photo.
After careful consideration, I've decided it's easier to move the outlet.
entry 357 By comparison, here is the economy radiator used by CMC.
This photo was taken by Heikki Rinta-Koski at the Walter Mitty event, one of CMC's quick builds.
entry 358 That mouth is full of radiator!
entry 359 The remains of my radiator bracket.
entry 360 While we're looking at Heikki's photos, here's a peek inside the CMC shop.
That Eleven body is gorgeous! It's now listed on the CMC site for $2000.
entry 361
June 11, 2004:
It's alive!
Well, sort of. I powered up the engine computer last night and verified that the pressure sensor, temperature sensors and a few other bits are reading properly. So now I have a very expensive and cumbersome barometer and thermometer. I did have to do a little fine-tuning on grounds and I'm not 100% convinced the fuel pump is playing along correctly, but I'm making good progress. The potential to start the engine this weekend is good.
entry 362
June 13, 2004:
No pictures today, but I've been busy.
I retrieved the radiator from the welding shop and decided to modify it myself. That's almost done, and once a certain hose arrives on Tuesday I'll be able to hook it up. The CMC mounting bracket has been completely removed because it just wasn't suitable for this rad. The special hose? That's because I have 1.5" outlets on the rad and 1.25" outlets on the engine. NAPA makes a flexible hose with different sizes on each end and they're even affordable. It's going to make life easy. I've also mounted the seatbelts, using the Miata upper belt guide to fit the shoulder belts. It looks good and I'm happy with the outcome. Now I can fit the seats (temporarily) and determine the ideal placement of the gas pedal. I need the belts to do this because they pull me back into the seat and change the driving position somewhat.
I've also tried to start the engine. First, fill the fuel tank with a bit of fuel. No leaks in the system! I ran the pump for a while to pressurize the system, fitted plug wires and checked all the connections. Then hit the starter button. Lots of cranking, no fuel or spark. Nuts. Time for some quality time with the wiring diagrams. The cam angle sensor is reading, so that's not it.
entry 363
June 14, 2004:
I'm all giddy.
Must be the exhaust fumes but it could also be the flames coming out of the exhaust ports. Yes, the engine is running and it sounds fantastic. Once the last couple of major grounds were actually attached to something instead of just hanging around, the engine fired up. Much noise and excitement. Sorry Eric, no sound files yet! Bill Cardell had come by to help me debug the ECU as it was obvious that was why the car started but I found the loose grounds before we got too far. This gave us lots of time to just hang around instead. The ECU needs a lot of tuning and there's no cooling system hooked up as yet so I didn't run it very long.
On the subject of the cooling system, that's almost done. The radiator has been modified using JB Weld - it might not be as sexy as welding, but it's good for the application, looks like a weld when shot with some silver paint and didn't cost me $90! I'm just waiting for the final hoses and it's good to go. The scuttle has also been fitted with bolts and I'm starting to fit body panels. The seatbelts are in - I'm particularly proud of the shoulder mounting points - and the seats will be ready to install once the transmission cover shows up and I have a driveshaft. I suspect I'm going to have to make my own tranny cover.
entry 364
 The modified radiator.
One blocked off outlet, one new outlet. It's still wet from getting flushed out. Note the ground-down corner on the radiator cap as well. I also had to shave off part of the bottom ridge to fit inside the nose cone perfectly.
entry 365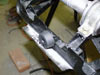 The bottom part of the original radiator bracket is all that remains.
The rubber bumper helps hold the rad in place nicely.
entry 366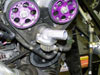 The radiator inlet is on the opposite side from the Miata.
If you take a 1.6 thermostat "neck" and put the housing from a 1.8 on it, it turns the direction of the outlet 90 degrees. Perfect! It also gets rid of a fitting for a temperature sensor I no longer need. You can see the original in this picture.
entry 367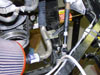 The lower radiator hose is pretty long, so I'm using this pipe from the Miata to join two sections.
entry 368 Harnesses are in!
entry 369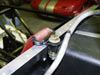 The attachment point for the shoulder harnesses.
This was taken from the Miata. It looks pretty good.
entry 370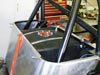 This is a little disconcerting - my fuel cell is inflating from the heat!
I'm going to call Jaz about this - there's a pressure relief valve on the cap but it's not relieving a whole lot of pressure. I can just imagine what this will be like in the hot Colorado sun.
entry 371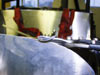 Fitting the scuttle required a little trimming to the aluminum firewall.
entry 372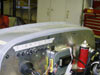 The scuttle temporarily bolted into place.
entry 373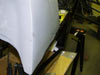 The fibreglass scuttle fits the frame perfectly once it's been trimmed to fit around the steering column support.
Better than any of the aluminum has fit so far - good thing, as it's harder to tweak! All of the glass parts appear to have the same high level of fit.
entry 374
<< | show individual entries | >>