build diary
<< | show individual entries | >>February 14, 2004:  Found my driver's seat!
entry 124 In order to fix the transmission, I need to pull off the extension.
Interesting stuff - I've never been inside a tranny before.
entry 125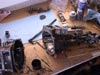 Putting some undamaged parts in the extension housing.
I have to keep the same housing because the VIN is on it, and I need a paper trail for the tranny to show it's not stolen.
entry 126 The tranmission is ready to be installed.
It took a lot of cleaning!
entry 127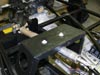 The steering column is bolted into place.
I did a little cutting to let the wheel sit slightly higher. It's not enough to cause strength problems with the bracket.
entry 128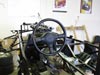 A stock-size steering wheel in the Seven cockpit.
That's a big wheel! It's originally out of a Canadian-spec 1990 Miata.
entry 129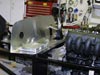 There's going to be loads of room available to work on the engine.
I think I'll put the ECU on this shelf to keep all the wires in the engine bay. The hole is for the stock Miata wiring harness so I'll probably plug it.
entry 130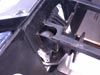 The new diff mount that was not on the GRM car.
entry 131
February 16, 2004:
I started on the wiring last night.
It turns out that my donor car was cannibalized for many useful connectors before I got it. Most of the specialised parts I wanted are AWOL. Sigh. Still, it does have a lot of what I need. I've taken the harness apart so that I can make as neat a harness as possible and to ease the conversion over to the 1.8 computer.
The GRM car does have the same diff mounts that mine does, but they might not have the bolts fully tight. They also used smaller diameter bolts than I did.
entry 132
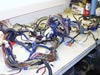 Wiring time!
I'm starting by unwrapping the Miata harness. I'm only going to use what I need.
entry 133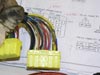 Looks like mice had a little fun with my wiring.
Oh goody.
entry 134
February 18, 2004:
I've been poring over wiring diagrams and trying to decide exactly what I want to do.
The picture is becoming clearer, but there are still some grey areas. It certainly would be cheaper and easier to simply run the stock setup from the car but that wouldn't do some of the things I want to do. My 1.8 coils did arrive today so I have everything needed...
entry 135
February 22, 2004:
Wiring work has begun in earnest.
I've spent a lot of time thinking about the various buttons and lights I want to use because it's fun. I've even found an extra ignition switch and key so I could use that if I wanted. But before I do that, I have some work to do on the harness. I'll weigh the leftover wires when I'm done, but based on what I saw on our Track Dog race car there is 20 lbs of wire waiting to be removed out of the harness. It's quite entertaining once you get started but it takes a bit of nerve. I'm trying to retain the stock 1995 wiring colours whenever possible but since my donor was a 1990 it's sometimes a little tricky. I've got a notebook full of notes as well as a factory manual and wiring diagrams for both 1990 and 1995. I've found some interesting things - including what appears to be the ability for a US-model car to honk the horn by jumping the right pins in the diagnostic connector. What?
On a different note, I had the scuttle and nose in place. Turns out there is minimal (ie, no) clearance between the engine and the hood. This might be fun to work out. I'll also have to cut out the bottom of the scuttle for my legs a little, but a lower seat would avoid this.
entry 136
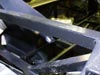 This is a mounting point for the shoulder harnesses.
But it's on the back of the bar on the GRM frame while it's on the bottom of mine. Hmm.
entry 137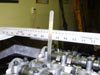 Hmm.
Hmm.
There's about 3" from the top of the head to the hood. Great. But the valve cover is just a little taller at the oil filler. I might have to move the fill hole like we did on the FM Track Dog race car.
entry 138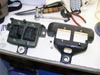 In order to the 1.8 coils on the 1.6 engine, I can mount them in the 1.6 bracket with a bit of modification.
That will be a nice clean setup.
entry 139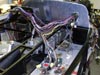 More wiring.
I draped the harness over the car to help with physical layout. I know the wiring of a Miata well but not when it's curled up on a workbench!
entry 140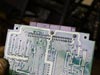 The Link ECU doesn't use every pin in the wiring harness - you can see how some of the pins at the top are not connected on the single-layer circuit board.
Those wires come out!
entry 141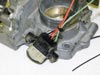 Missing connectors? Turns out the pins are the perfect size to take ECU connectors.
A bit of heat shrink and it's ready to go.
entry 142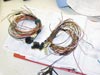 There's a lot of weight to be saved by thinning out the wiring harness.
This is the wiring to make the headlights pop up, not including relays and motors!
entry 143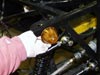 A local parts store find - front turn indicators for $2.99 each.
Plastic and super-light too.
entry 144
<< | show individual entries | >>