build diary
<< | show individual entries | >>April 10, 2006:  Artsy shot.
entry 1192
April 11, 2006:
Last night I tore into the car again.
The nose and front fenders came off for a repaint so the car looks good at Car and Driver. The nose in particular was pretty battered with some missing paint due to a badge misadventure. Hopefully there's enough paint left from the original batch to cover it. I tightened some fittings on the front brakes and tonight I'll find out if that sealed everything. It looks as if the brake problem was simply a seeping fitting. I was putting a fair bit of pressure through the lines over the weekend! Mark commented that I had the speed in the straights of the fast Subarus, but the braking points of his naturally aspirated Miata with sticky tires. Anyhow, that was the accomplishment for last night. I'm pretty sure there was more but I can't think of what it might be. Oh well. The list of jobs to do before Texas doesn't seem to be getting any shorter, but it does seem to be more specific than before.
entry 1193
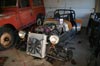 So, what does your car look like the day after setting a track record?
entry 1194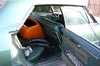 When transporting body parts for painting, it's important to take care of them.
This means putting them in the back seat of a 1966 Cadillac of course.
entry 1195
April 13, 2006:
The car isn't getting any more together than it was.
Less so - last night I pulled off the scuttle. The instruments were remounted (a washer had escaped and the needles were dragging on the glass), a hole drilled for a new oil pressure light, wiring for the light was put in place, the windshield was measured up for reproduction, wiring was cleaned up and the brakes were bled. I've heard that the body parts are painted so I'll go pick those up later today. Tonight I hope to reassemble the car and drive it in to work tomorrow.
entry 1196
 I seem to have conquered my fear of drilling holes in my fibreglass.
This is for an amazingly bright "you have no oil pressure!" light.
entry 1197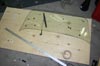 Time to work on the new windshield.
This one will probably be too low of course, but I reserve the right to make that error.
entry 1198
April 14, 2006:
A frustrating day.
I stuck all the various pieces back on the car so I could bring it in to work this morning. Paint the grille surround black, fit the Dzus fasteners, new foam tape for the bonnet, bolt on the front fenders, install the wheels, install new fuel injector connectors and tape up the wiring - you know, the usual. I also cut the new windshield template. I jumped into the car to bring it down to the glass shop and...nothing. It cranked enthusiastically (good little battery, that Odyssey!) but there was no fuel whatsoever. We pulled the ECU out and found a problem with the chip, so I changed that and loaded in my special programming. Finally, a few hours later (I have a very, very understanding boss) Tore off down the street to see if an upholstery shop could make a little tonneau cover and of course I'm a little late to get all this done before I leave next week. Then outside the upholstery shop, same deal. Nothing. I borrowed a screwdriver, popped the top off the ECU case and wiggled what we thought might be the problem and the car fired up. Argh. When I got back, it wouldn't start. Later in the day, going to pick up the glass (the Glass Brokerage once again came through with a same-day windshield for $40!) it fired right up. I'll be into the ECU again tonight. Not exactly what I wanted to do of course. I have a few other things I was planning on doing.
A little treatise on my new oil pressure light. I used to use a gauge for the oil pressure. The problem is that it's constantly moving (of course) and I'm afraid I'll miss it if a problem shows up. So I elected to go with a light that's right beside my rev gauge. This way, if it lights up I'll know to kill the engine immediately. Ideally I'll have both. Someday I'll revisit instrumentation and do it then. I did have to plug in a sender from a 1995 Miata to make this work but otherwise it was the same wiring.
entry 1199
 The new vs the old.
Well, the template for the new anyhow. It's not a major change but I think it will really affect the look of the car.
entry 1200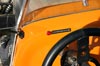 The new oil pressure light.
It's the brightest light I could find at Radio Shack and is nice and visible.
entry 1201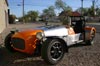 A gratuitous shot of the car.
entry 1202
April 16, 2006:
Well, yesterday wasn't much better when it came to frustration.
I started by installing a new ECU and tidied up the wiring a bit. I even installed the ECU case on rubber isolators in case part of my problems were related to vibration (in the Seven? impossible!). I then turned to the windshield.
One of the things I did with this latest piece of glass was make it symmetrical. My previous versions were not. The bending of the channel went quite easily after all my hard-earned lessons last time. The plywood was 0.8mm thicker this time which actually made things a little more difficult. The nice thing about a symmetrical top is that instead of having to set up my bending tool twice, I simply turned the piece of channel around and did both sides that way. A bit of Scotchbrite on the aluminum and it looks really good. I hopped into the Seven to run down to work because I wanted to touch up some welding on the side support. That went well - and the Seven refused to start. It was the same symptoms as before except that I never managed to get it running again. I spent a long time on the phone with my friend and boss Bill to no avail. The current thinking is that something in my original ECU is damaging the processors in the chips. I'll try a new chip in this new ECU and see what happens. Argh.
Today was set aside to do some work on my trailer. It's been having some cracking problems where a loose fender once vibrated badly. I've been patching it up but it was time to fix that for good. Some hefty angle iron and some fun with the plasma cutter and it's much better. I wouldn't tow a 3000 lb vehicle on it, but 1300? No problem.
Once that was done I stuck the windshield on the side supports and went to bolt it up. Uhoh. My previous glass wasn't symmetrical because my scuttle isn't symmetrical. I also put the side supports a little too high and it was difficult to get the windshield level as it teeter-tottered on a high point in the middle of the scuttle. Some choice words, some oversize holes and it's done. The flat top makes a level mounting crucial. So how does it look? Fantastic. The rounded top has bugged me since I first put the windshield on the car. The new design, about 1.5" lower in the middle, looks much more aggressive and is still out of my sight line. It was a little frustrating but I'm done.
And that concludes the last full day I have to work on the Seven before the Texas meet. Mark Rivera reports that his car is running well. With a 12 psi turbo on the engine, it should really scoot. Chris Fiaccone's bike-engined car will also make mine look slow. I'm going to look like the sad also-ran!
entry 1203
April 17, 2006:
Exorcised!
Jeremy figured it out. With one of the ECUs attached to the simulator, he started twiddling dials. He poked one and the injectors woke up. What was it? The throttle position sensor (TPS) signal. I hadn't played with it because I "knew" it couldn't be the problem. Above a certain value, it was preventing the injectors from firing. With the wiring for the TPS removed, there was a phantom signal that was changing with heat. With a cold ECU, it would sometimes be low enough to let the injectors fire. As things warmed up, it would rise to the point where the car wouldn't get fuel. See, the ECU has a setup where if you crank on wide open throttle, it won't fire the injectors to help clear a flooded condition. This is what was being triggered. I solved the phantom signal problem by installing a jumper between the TPS signal input and the reference voltage coming out of the ECU. No more heat-related variance and a nice consistent start. The odd thing is that the TPS has been removed from the car for months. I trimmed some wires back when cleaning up the engine bay and that's when the signal must have started to creep. Very odd. I must admit that if your car is going to develop this problem, it should always develop it at the Flyin' Miata shop where there is more gathered Miata wiring knowledge and diagnostic tools than anywhere else on the planet. A big thanks to Jeremy for finding the trigger for the problem and an even bigger thanks to Bill who spent hours with me on trying to chase this down.
So, with two more evenings before I leave, I have only a few things to do. First is to bend up the new hood. The flat, louvred sheet arrived today. I may chicken out and get a local fabrication shop to help me as I'm scared to screw it up. I'll also cut a new stone shield for the driver's side, as the new one on the passenger's side makes it look battered. Pack the trailer, gather the tools (the garage is a little, umm, chaotic) and I'm pretty much ready to go. I hope so anyhow.
entry 1204
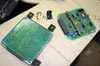 ECU hassles are just what I don't need at this point.
entry 1205 The new rubber isolators for the ECU.
In case anyone doesn't accuse me of being "locost", they're old bicycle inner tubes!
entry 1206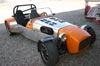 A bad picture of the new windshield.
With the grille in place and the filter sticking out through the hood, it's one mean looking little car right now.
entry 1207
April 18, 2006:
The new hood is finished.
It took a few hours - I don't want to figure just how many - but it worked far better than the original one. I sucked it up and went at it by myself. Instead of 0.050" 5052 alloy, this one is 0.060" 3003 and it's much easier to work. It doesn't exactly fall in to place but I was able to shape it nicely. The 5052 needed to be over-bent and then sprung back while the 3003 is soft enough to simply push it into place. A comparison of the fit of the hoods shows a massive improvement over my original and I'm very happy with it. I used a Scotchbrite wheel to do some final shaping and the finish is smooth and even. Even better is the fact that the louvres are not embarassingly backwards. They're also higher quality than my last one. A win overall!
One thing I did change that made the fabrication easier had to do with the lower edge. Instead of folding it under, I cut it off level with the frame rail. I then riveted a piece of alumimum channel along the inner edge to act as a support. This channel was left over from my original windshield fabrication - it was the stuff that I couldn't bend without kinking. Now I don't want it to bend so it's perfect. I'm not crazy about the rivets along the edge of the hood but I'll live with that.
So, what's left before I leave? I'd like to replace that stone shield, I want to ensure the fuel pump is clean and I have to pack. And that's about it! Wow. I do have to thank my girlfriend Janel for keeping me alive during this thrash. If it wasn't for her dropping by the shop with food I'd probably have starved to death.
entry 1208
April 19, 2006: 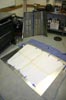 As the old hood looks on, the new one prepares for surgery.
See that engine hiding behind? That's waiting for a new project...
entry 1209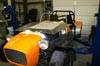 According to Ron Champion, all you do now is just use the scuttle and nose and bend the aluminum around.
Umm, it's not quite as simple as that sounds.
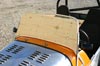
entry 1210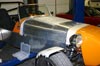 After some fairly lightweight work (well, by comparison to my first time around anyhow), here's how the hood fits without anything holding it down.
Whoops, something seems to be missing.
entry 1211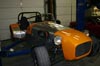 Now with a hole for the intake system and latches.
entry 1212 Louvres, now pointing the correct way.
entry 1213
<< | show individual entries | >>