build diary
<< | show individual entries | >>March 2, 2006:
I couldn't help myself last night.
The garage door was open and beckoning me. Well, I had to see how the new exhaust sounded, didn't I?
And it sounds good. My initial impressions are still true - it's a nice sound right up to redline. It's not a quiet sound but it's acceptable for street use. Quieter than a Harley, that's for sure. When I dropped by to visit some friends who were working on stuffing a twin-turbo rotary into an unsuspecting Miata, they thought a Hayabusa or some other sport bike had pulled up outside. A big part of this was how fast the engine revved when I blipped the throttle as I manouvered around.
Of course, part of the fun of testing at night is the fireballs. On closed throttle deceleration, I'm still running pretty rich. That means that coming into corners the car is blowing flame and making the classic little sports car burbles and pops. Then BLAM! and a fireball. I giggle a lot when this happens.
entry 1133

March 3, 2006:
I'll be off in Moab this weekend on various bicycles, but given the weather report I'll be missing the Seven.
There's a local track day too. I seem to have rekindled my fire for the car. Or the backfires lit something.
This popped up on a Caterham list. Now, I'm pretty proud of my little Caterham model (see here if you don't know of it) but these are astounding.
1:18 scale
1:12 scale page 1 (like my own)
1:12 scale page 2
entry 1134
March 12, 2006:
The battery has been moved.
It was a tougher job than I'd anticipated - it appears I built the car around the main power cables! The old battery won't even come out of the car without removing either the rear panel or the fuel tank! Good thing I have plans to make a new tank then.
It was a struggle to get to the various ties holding the main power leads in the transmission tunnel. Last time I was in there, there was no driveshaft or rear end and I was making very sure everything was clear of the driveshaft. There were an amazing number of zipties in the way! I did eventually triumph and freed the cables from their prison. The battery is now situated in the passenger's footwell. I considered mounting in the engine bay but this worked out better for the new kill switch I also installed. I have always been able to disable the ignition by taking the ECU keypad out of the car, but the starter motor was always energised. The new kill switch not only is a good idea for track use but also lets me remove the "key" from the car for a bit more security. It also lets me cut the battery while working on the car, something I've always appreciated on my old Land Rover. I can also easily access a hot terminal in the engine bay for jumping or charging - a nice touch. It has a removeable insulator on it so nothing exciting happens.
While removing things from the car, I also pulled the intake manifold off. This gives me a little more room for working on the wiring but more importantly lets me fix a little slop in the mechanism.
entry 1135
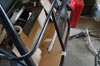
March 13, 2006: 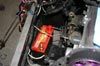 One option for a battery location.
entry 1136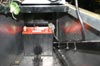 The final location before the tiedowns were added.
The bundle of green wire is for an ECU-triggered shift light or some other RPM-related function. I'm not using it at the moment.
entry 1137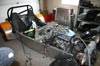 It really doesn't take long to disassemble the car this far although it sure looks like major work.
entry 1138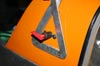 Stolen from Caterham, here's my kill switch location.
In person you don't see any white around the switch - the flash really emphasised that.
entry 1139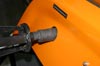 A little touch to make the car look a little more finished.
I stretched a mountain bike inner tube over the bare metal steering column. This picture is not flattering of the result - it's a cleaner look in person.
entry 1140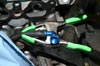 A cheap way to clamp off fuel lines.
That's a 99 cent tool!
entry 1141
March 15, 2006:
Lots of destruction last night.
I reinstalled the throttle bodies a couple of days ago after fixing a small amount of play in the synchronising mechanism. It wasn't causing a huge problem but it did mean that I couldn't run an idle switch for the ECU. See, the ECU gets upset if the engine speed hits 2000 rpm and the throttle body is still at idle. I had just enough slop to make this happen when leaving from rest, leading to a bad driveability problem. So I'd been driving around without an idle switch which was fine other than cold start up. After installing the fixed throttle bodies, I adjusted the butterflies by eye and fired up the car. It idled happily even though it was stone cold. Very nice.
I drove the car out the garage, turned it around and then went right back in. Why? Time to work on the gas tank! First the fenders came off (didn't I just put one of those on?), then the rear panel was removed. Now the fun part - the fuel tank. I'd forgotten how much fun that was, having to remove every single fitting on the tank by putting my arm inside. At least it's the last time for this tank! The car now looks truly sad but I'm on a mission to build this tank as quickly as possible.
The new design will sit at the rear of the car behind the differential instead of on top. This is a more traditional Se7en tank. It'll be wider and thus more susceptible to fuel slosh, but I'll address that with internal baffles. The best thing is that the center of gravity in the rear will drop down significantly, cutting down on roll. This is my primary reason for the work. I'll also have a trunk of sorts! Initial calculations tell me that by simply filling the area below where the old tank sat, I'll have a 6-7 gallon capacity. Not bad at all! Tonight I'll make a cardboard version.
entry 1142
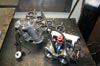 Fixing the throttle bodies for better synchronisation.
There was a bit of slop in the mechanism that joined the two halves.
entry 1143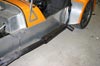 I had a request for a better shot of the exhaust.
I haven't had the car outside in the light for a while so this is the best I can do at the moment...
entry 1144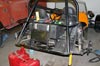 The rear bodywork is off, now it's time to get that old fuel tank out of there.
entry 1145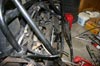 The rear end naked and ready for a new tank.
I'm going to put the tank in the deep area at the back and use the small hole in the center (you can see the grey sway bar in it) as a sump. It should work out pretty nicely.
entry 1146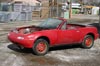 A new project, as if I needed one.
This is going to become a fairly potent naturally aspirated Miata rally car. More details to come!
entry 1147 Maybe I should put one of these cars together so I can drive it!
entry 1148
March 18, 2006:
I was supposed to be on my way to a track day, but a Colorado storm took care of that plan.
So instead I dug into the job of the fuel tank. Step 1 was to spend some time with cardboard. It looked fairly easy, but I had to consider removal as well as fuel flow and capacity. I do not want to end up with a tank that requires much disassembly to remove. After a couple of hours I had the solution and some quick calculations showed the capacity as 7.5 gallons. Excellent!
With a wave of my magic wand I transformed the cardboard models into steel. By "magic wand" I mean bandsaw, belt sander and welder of course. On the first test fit, the tank fit perfectly and I was able to install it without resorting to cheating. Hopefully that will be the case with the final unit! Once four sides were done I decided to weld up my sump. Once that was finished, I took a look and decided there was a better way. 30 seconds later, the plasma cutter had removed a big chunk of what I had. The sump is now complete and ready to be affixed to the bottom of the tank, then it's just a matter of a couple of internal baffles, the top and then sealing. POR-15 makes a gas tank restoration kit that should do the job nicely.
entry 1149
March 19, 2006:
Today was supposed to be a ski day, but, well, it didn't happen.
So I went mountain biking and then attacked the tank again. I'm really enjoying this. The sump was welded on along with a couple of internal baffles and then the back. Now I just have to install the fitting for the return line and weld the top on the tank. Some sealant, paint on the outside and then it's just a bit of plumbing. I'm pretty happy with this upgrade so far. I think it's going to be all good with little or no downside other than a lost weekend spent fabricating. And is that really lost?
entry 1150
 The cardboard templates for the new fuel tank.
entry 1151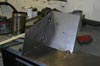 There are some odd angles in the tank to let it fit into the car.
entry 1152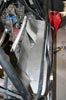 The first test fit of the new "tank" - sort of.
It fits!
entry 1153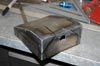 The first sump.
It probably would have worked well, but I thought it could be better.
entry 1154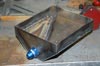 The reconfigured sump, ready to weld on to the tank.
entry 1155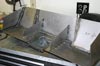 The sump is in along with a couple of baffles to cut down on sloshing.
I'll have foam in the tank as well. The baffles don't go all the way to the top so I can actually put the foam in the tank.
entry 1156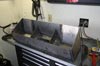 The back of tank is on.
Only one more panel left. Of course it will probably turn out to be the biggest hassle of the lot.
entry 1157 Before I weld the top on, I think I'll add a couple of straps like this to keep the sump nicely filled.
Of course, in the current state I figure I won't have fuel starvation until I'm down to about a cup of fuel and pulling a high-g corner.
entry 1158
<< | show individual entries | >>